Register your product and get support at
HR7761
HR7762
HR7763
www.philips.com/welcome
Specifications are subject to change without notice
© 2012 Koninklijke Philips Electronics N.V.
All rights reserved.
HR7761_7762_7763_ WEU2_UM_V1.4
1
(HR7762, HR7763)
(HR7762, HR7763)
(MAX)
5 x 1 sec 500 g
5 x 1 sec500 g
30 sec 50 g
60 sec 250 g
45 sec 250 g2
30 sec 200 g2
2-3 min 500 g
360 ml
350 ml
4 pcs
1
1
1
2
P/2
P
1
30 sec2 pcs1
30 sec 500 g1
30 sec 300 g1
30 sec 300 g1
30 sec 200 g1
30 sec 500 g1
60-180 sec
60-180 sec
1
30 sec 200 g
30 sec 500 g
400 g
30 sec 500 g
1
30 sec2 pcs
1
1
(HR7761)
30 sec 200 g1
30 sec 500 g1
(HR7762, HR7763)
1 min 1 L
1 min 1 L
1 min 1 L
3 min
600 ml
P
P x 9
6 x
30 sec 40 g
30 sec 70 g
30 sec 40 g
30 sec 50 g
2
2
2
2
2
2
2
2
30 sec2 pcs
30 sec 500 g1
5 sec 100 gP
30 sec 500 g1
(HR7763)
(HR7762)
2
43
5
76
8
English
1 Important
Read this user manual carefully before you use the appliance, and save the user manual for
future reference.
Danger
• Do not immerse the motor unit in water nor rinse it under the tap.
Warning
•
Neveruseyourngersoranobject(forexample,aspatula)topushingredientsinto
thefeedingtubewhiletheapplianceisrunning.Onlyusethepusher.
• Beforeyouconnecttheappliancetothepower,makesurethatthevoltageindicated
onthebottomoftheappliancecorrespondstothelocalpowervoltage.
• Never connect this appliance to a timer switch, to avoid a hazardous situation.
• Ifthepowercord,theplug,orotherpartsaredamaged,donotusetheappliance.
• Ifthepowercordisdamaged,youmusthaveitreplacedbyPhilips,aservicecenter
authorizedbyPhilips,orsimilarlyqualiedpersonstoavoidahazard.
• Thisapplianceisnotintendedforusebypersons(includingchildren)withreduced
physical,sensoryormentalcapabilities,orlackofexperienceandknowledge,unless
theyhavebeengivensupervisionorinstructionconcerninguseoftheappliancebya
person responsible for their safety.
• For their safety, do not allow children to play with the appliance.
• Never let the appliance run unattended.
• Iffoodstickstothewalloftheblenderjarorbowl,switchofftheapplianceandunplug
it. Then use a spatula to remove the food from the wall.
• Be careful when you handle or clean the inserts, the blade unit of the food processor,
and the blade unit of the blender and the mini chopper. The blade units and the inserts
are very sharp.
• Donottouchtheblades,especiallywhentheapplianceispluggedin.Thebladesare
very sharp.
• Ifthebladesgetstuck,unplugtheappliancebeforeyouremovetheingredientsthat
block the blades.
Caution
•
Neverswitchofftheappliancebyturningtheblenderjar,thebowl,ortheirlids.Always
switchofftheappliancebyturningthespeedselectorto0.
• Unplugtheapplianceimmediatelyafteruse.
• Alwaysunplugtheappliancebeforeyoureachintotheblenderjarwithyourngersor
anobject(forexample,aspatula).
• Waituntilthemovingpartsstoprunningbeforeyouremovethelidofthebowlorjar.
• Donotexceedthemaximumlevelindicationonthejarorthebowl.
• Thoroughlycleanthepartsthatcomeintocontactwithfoodbeforeyouusethe
applianceforthersttime.
• Beforeyouremoveorcleantheinserts,kneadinghooks,ordiscs,unplugtheappliance.
• NeveruseanyaccessoriesorpartsfromothermanufacturersorthatPhilipsdoesnot
specicallyrecommend.Ifyouusesuchaccessoriesorparts,yourguaranteebecomes
invalid.
• This appliance is intended for household use only.
• Donotexceedthequantitiesandprocessingtimeindicatedintheusermanual.
• Lethotingredientscooldown(<80ºC)beforeprocessingthem.
• Alwayslettheappliancecooldowntoroomtemperatureaftereachbatchthatyouprocess.
• Certainingredientsmaycausediscolorationsonthesurfaceoftheparts.Thisdoesnot
haveanegativeeffectontheparts.Thediscolorationsusuallydisappearaftersome
time.
Note
•
Noiselevel=78dB[A]
Electromagnetic elds (EMF)
ThisPhilipsappliancecomplieswithallstandardsregardingelectromagneticelds(EMF).If
handledproperlyandaccordingtotheinstructionsinthisusermanual,theapplianceissafe
tousebasedonscienticevidenceavailabletoday.
Recycling
Yourproductisdesignedandmanufacturedwithhighqualitymaterialsandcomponents,
which can be recycled and reused.
When you see the crossed-out wheel bin symbol attached to a product, it means the
productiscoveredbytheEuropeanDirective2002/96/EC:
Neverdisposeofyourproductwithotherhouseholdwaste.Pleaseinformyourselfabout
the local rules on the separate collection of electrical and electronic products. The correct
disposalofyouroldproducthelpspreventpotentiallynegativeconsequencesonthe
environment and human health.
2 Introduction
CongratulationsonyourpurchaseandwelcometoPhilips!Tofullybenetfromthesupport
thatPhilipsoffers,registeryourproductatwww.philips.com/welcome.
Thisapplianceisequippedwithabuilt-insafetylock.Youcanonlyswitchontheappliance
afteryoucorrectlyassemblethefollowingpartsonthemotorunit:
• the food processor bowl and its lid, or
• theblenderjaranditslid,or
• the mini chopper.
If these parts are assembled correctly, the built-in safety lock is unlocked.
Forrecipes,gotowww.philips.com/kitchen
3 Food processor
Blade unit
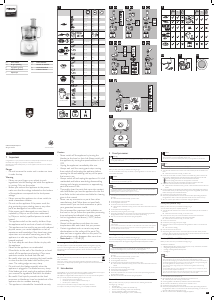
Beforeyoustart,makesurethatyouassembleaccordingtoFig.2.
Youcanusethebladeunittochop,mix,blend,orpureeingredients.
Caution
• Donotusethebladeunittochophardingredients,likecoffeebeans,turmeric,nutmeg,andice
cubes,asthismaycausethebladetogetblunt.
Note
• Donotlettheapplianceruntoolongwhenyouchop(hard)cheeseorchocolate.Otherwisethese
ingredientsbecometoohot,starttomelt,andturnlumpy.
• Precutlargepiecesoffoodintopiecesofapprox.3x3x3cm.
1 Turnthebowlclockwisetoxitonthemotorunit,andthenputtheshaftinthebowl.
» Whenthebowlisxedcorrectly,youhearaclick.
2 Take the blade unit out of the protective cover.
3 Putthebladeunitontheshaft.
4 Puttheingredientsinthebowl.
5 Putthelidonthebowl,andthenturnthelidclockwisetoxit.
» Whenthelidisassembledcorrectly,youhearaclickandthelidisxedtothe
bowl handle.
6 Putthepusherintothefeedingtube.
7 Connectthepowerplugtothepowersupply.
8 Select the speed that matches the color of the accessory - speed 1.
9 Afteruse,turnthespeedselectorto0,andthenunplugtheappliance.
Tip
• When you chop onions, turn the speed selector to P a few times to prevent the onions from
becomingtoonelychopped.
• How to remove food that sticks to the blade or to the inside of the bowl? 1. Switch off the appliance,
andthenunplugit.2.Removethelidfromthebowl.3.Removetheingredientsfromthebladeor
from the side of the bowl with a spatula.
Kneading accessory
Beforeyoustart,makesurethatyouassembleaccordingtoFig.3.
Youcanusethekneadingaccessorytokneadyeastdoughforbreadandpizzas.Youneedto
adjusttheamountofliquidtoformthedoughaccordingtothehumidityandtemperature
condition.
1 Turnthebowlclockwisetoxitonthemotorunit,andthenputtheshaftinthebowl.
» Whenthebowlisxedcorrectly,youhearaclick.
2 Putthekneadingaccessoryontheshaft.
3 Puttheingredientsinthebowl.
4 Putthelidonthebowl,andthenturnthelidclockwisetoxit.
» Whenthelidisassembledcorrectly,youhearaclickandthelidisxedtothe
bowl handle.
5 Connectthepowerplugtothepowersupply.
6 Select the speed that matches the color of the accessory - speed 1.
• Dependingontherecipe,pourliquidingredientintothefeedingtubewhilethe
device is turned on.
7 Afteruse,turnthespeedselectorto0,andthenunplugtheappliance.
Discs and Inserts
Beforeyoustart,makesurethatyoupickyourdesireddiscfromfollowingandassemble
accordingtoFig.4andFig.5:
• Emulsifyingdisc
• Reversibleslicing/shreddingdisc(ne)(HR7762andHR7763only)
• Reversibleslicing/shreddingdisc(coarse)(HR7762andHR7763only)
• Frenchfrydisc(HR7762andHR7763only)
• Granulatingdisc(HR7762only)
• Juliennedisc(HR7763only)
Caution
• Becarefulwhenyouhandletheslicingbladeofdisc.Ithasaverysharpcuttingedge.
• Neverusethedisctoprocesshardingredients,likeicecubes.
• Donotexerttoomuchpressureonthepusherwhenyoupressingredientsintothefeedtube.
1 Turnthebowlclockwisetoxitonthemotorunit,andthenputtheshaftinthebowl.
» Whenthebowlisxedcorrectly,youhearaclick.
2 Putthediscontheshaft.Forinserts(HR7761only),placeaninsertintheinsertholder
as indicated below, then place the insert holder with insert on the shaft.
Placetheopeningoftheinsertovertheshaftoftheinsertholder.
Pushtheopeningoftheinsertovertheprojectionontheshaft.
Presstheinsertontotheinsertholderuntilitlocksinpositionwithaclick.
3 Putthelidonthebowl,andthenturnthelidclockwisetoxit.
» Whenthelidisassembledcorrectly,youhearaclickandthelidisxedtothe
bowl handle.
4 Puttheingredientsintothefeedingtubewiththepusher.Fillthefeedingtubeevenlyfor
thebestresults.Whenyouhavetoprocessalargeamountofingredients,processsmall
batches and empty the bowl between batches.
5 Connectthepowerplugtothepowersupply.
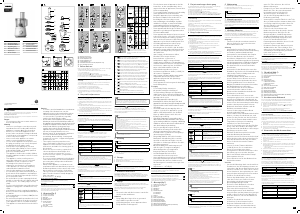
6 Checkthepreparationtime,themaximumamountandthespeedsettingrequiredfor
theingredientsinTable1.Selectthespeedthatmatchesthecoloroftheaccessory.
7 Afteruse,turnthespeedselectorto0,andthenunplugtheappliance.
4 Mini chopper
Beforeyoustart,makesureyouassembleaccordingtoFig.6.
Caution
• Donotusetheminichoppertochophardingredients,likenutmeg,Chineserocksugar,oricecubes.
• Never use the mini chopper for more than 30 seconds without interruption.
• Assemblethesealingringontothebladeunitbeforeyouattachthebladeunittotheminichopper,
toavoidleakage.
• Alwaysprocesscloves,staranise,andaniseedtogether.Ifprocessedseparately,theseingredientsmay
attack the plastic materials of the appliance.
• Theminichopperbeakermaybecomediscoloredwhenyouusethemilltoprocessingredients,like
cloves, anise, and cinnamon.
• Donotusetheminichoppertoprocessliquidslikefruitjuice.
• Lethotingredientscooldown(<80ºC)beforeprocessingthem.
1 Puttheingredientsintheminichopperbeakerwithinthemaximumindication.
2 Turnthebladeunitanticlockwiseontheminichopperbeakeruntilitisxedproperly.
3 Turn the mini chopper clockwise onto the motor unit until you hear a click.
4 Connectthepowerplugtothepowersupply.
5 Select the speed that matches the color of the accessory - speed 2. Let it run for about
10-30secondsuntiltheingredientsareneenough.
6 Afteruse,turnthespeedselectorto0,andthenunplugtheappliance.
7 Turn the mini chopper anticlockwise to take it off from the motor unit.
8 Turn the blade unit clockwise to take it off from the mini chopper beaker.
Tip
• Forbestresultswhenprocessingbeef,pleaseuserefrigeratedbeefcubes.
• Howtoremovetheingredientsthatsticktothesideoftheminichopper?1.Switchofftheappliance,
andthenunplugit.2.Removethebeakerfromthebladeunit.3.Removetheingredientsfromthe
blade or from the side of the beaker with a spoon.
5 Blender
Beforeyoustart,makesureyouassembleaccordingtoFig.7.
Theblenderisintendedfor:
• Blendinguids,likedairyproducts,sauces,fruitjuices,soups,mixeddrinks,andshakes,
• Mixingsoftingredients,likepancakebatter,
• Pureeingcookedingredients,likebabyfood.
11
12
HR7761
HR7762, HR7763
Note
• Donotexerttoomuchpressureonthehandleoftheblenderjar.
• Neveropenthelidtoputyourhandoranyobjectinthejarwhiletheblenderisrunning.
• Alwaysassemblethesealingringontothebladeunitbeforeyouattachthebladeunittotheblender
jar.
• Toaddliquidingredientsduringprocessing,pourthemintotheblenderjarthroughthefeedinghole.
• Precutsolidingredientsintosmallpiecesbeforeyouprocessthem.
• Ifyouwanttopreparealargequantity,processsmallbatchesofingredientsinsteadofalarge
quantityatonce.
• Usecookedingredientswhenyoublendasoup.
• Toavoidspillage:Whenyouprocessaliquidthatishotortendstofoam(forexample,milk),donot
putmorethan1literofliquidintheblenderjar.
• Ifyouarenotsatisedwiththeresult,switchofftheapplianceandstirtheingredientswithaspatula.
Removesomeofthecontentstoprocessasmallerquantityoraddsomeliquid.
1 Turnthebladeunitontheblenderjar.
2 Placetheblenderjaronthemotorunitandturnitclockwisetoxit.
» Whenthejarisxedcorrectly,youhearaclick.
3 Puttheingredientsintheblenderjarwithinthemaximumlevelindication.
4 Placethelidontheblenderjar,andthenturnitclockwisetoxit.
5 Connectthepowerplugtothepowersupply.
6 Select the speed that matches the color of the accessory - speed 2.
7 Afteruse,turnthespeedselectorto0,andunplugtheappliance.
Tip
• Howtoremovetheingredientsthatsticktothesideoftheblenderjar?1.Switchofftheappliance,
andthenunplugit.2.Openthelid,andthenuseaspatulatoremovetheingredientsfromthesideof
thejar.3.Keepthespatulaatleast2cmfromtheblade.
6 Cleaning and storage
Caution
• Beforeyoucleantheappliance,unplugit.
• Makesurethatthecuttingedgesoftheblades,discs,andtheinsertsdonotcomeintocontactwith
hardobjects.Thismaycausethebladetogetblunt.
• Thecuttingedgesaresharp.Becarefulwhenyouclean.
1 Cleanthemotorunitwithamoistcloth.
2 Cleantheotherpartsinhotwater(<60ºC)withsomewashing-upliquidorina
dishwasher.
3 Store the product in a dry place.
Quick cleaning
Youcanfollowthefollowingstepstocleanthefoodprocessorbowlandblenderjareasier.
Note
• Makesurethatthebladeisassembledinthebowlifyoucleanthefoodprocessorbowl.
1 Pourlukewarmwater(notmorethan0.5liters)andsomewashing-upliquidintothe
foodprocessorbowlorblenderjar.
2 Placethelidonthefoodprocessorbowlorblenderjar,andthenturnitclockwiseto
xit.
3 Turn the speed selector to Puntilthebowlorjarisclean.
4 Lettheappliancerunfor30secondsoruntilthefoodprocessorbowlorblenderjaris
clean.
5 Detachtheblenderjarorfoodprocessorbowlandrinseitwithcleanwater.
7 Guarantee and service
If you have a problem, need service, or need information, see www.philips.com/support or
contactthePhilipsConsumerCareCenterinyourcountry.Thephonenumberisinthe
worldwideguaranteeleaet.IfthereisnoConsumerCareCenterinyourcountry,gotoyour
localPhilipsdealer.
1/3314003529941
EN User manual
DA Brugervejledning
NO Brukerhåndbok
PT Manual do utilizador
ES Manual del usuario
FI Käyttöopas
SV Användarhandbok
EL Εγχειρίδιο χρήσης
TR Kullanım kılavuzu
TH
คู่มือผู้ใช้
IN
Buku Petunjuk Pengguna
13


Bu ürün hakkındaki sohbete katıl
Burada Philips HR7763 Viva Collection Mutfak robotu hakkında ne düşündüğünüzü paylaşabilirsiniz. Bir sorunuz varsa öncelikle kılavuzu dikkatlice okuyun. Kılavuz talebinde bulunmak için iletişim formumuzu kullanabilirsiniz.