Parts Description / Description Des Pièces / Onderdeel
Beschrijving / Teilebeschreibung / Descrizione Delle Parti /
Descripción De Las Piezas / Descrição Dos Componentes / Parça
Tanımları / Описание частей
/فصولا ءازجأ
/
/
EN Instruction Manual
SAFETY
IMPORTANT INSTRUCTIONS ON SAFETY OF USE PLEASE READ CAREFULLY AND
KEEP FOR FUTURE REFERENCE!
•These important safety precautions are critical part of the appliance. Please
read them all carefully before using the appliance for the rst time. You may
keep the instructions for future reference or pass it to other users.
The appliance is designed for domestic use and may only be operated in
accordance with these instructions for use.
Always handle with care and warn other users the potential danger.
DANGER: Misuse of the appliance can cause injury!
DO’s
1.Check the mains voltage stated on the rating plate corresponds to the local
electricity supply.
2.Unwind and straighten the power cord before using the appliance.
3.Place the appliance on a rm and steady surface. The appliance must be
used and rested on a stable surface.
4.Disconnect the appliance from mains supply outlet under the following
conditions:
- Before the water tank is lled with water.
- Before removing any parts from the appliance or ret any parts on the
appliance.
- Before cleaning or maintenance.
- When the appliance is not working correctly.
- After using the appliance.
5.Empty the water tank, when the appliance unused for long period.
6.Allow to cool before putting on or taking o parts, and before cleaning the
appliance.
7.Always use cold water to make coee. Warm water or other liquids could
cause damage to the coee maker.
8.If the power cord is damaged, it must be replaced by the manufacturer or its
service agent or similarly qualied person in order to avoid any hazard.
9.Use the grinder for grinding coee bean only.
10.Always disconnect the appliance from the supply if it is left unattended
and before assembling, disassembling or cleaning.
11.Appliance can be used by persons with reduced physical, sensory or
mental capabilities or lack of experience and knowledge if they have been
given supervision or instruction by a person concerning use of the appliance
in a safe way and understand the hazards involved.
12.Children shall not be playing with the appliance.
13.This appliance shall not be used by children. Keep the appliance and its
cord out of reach of children.
14.This appliance is designed for household use only.
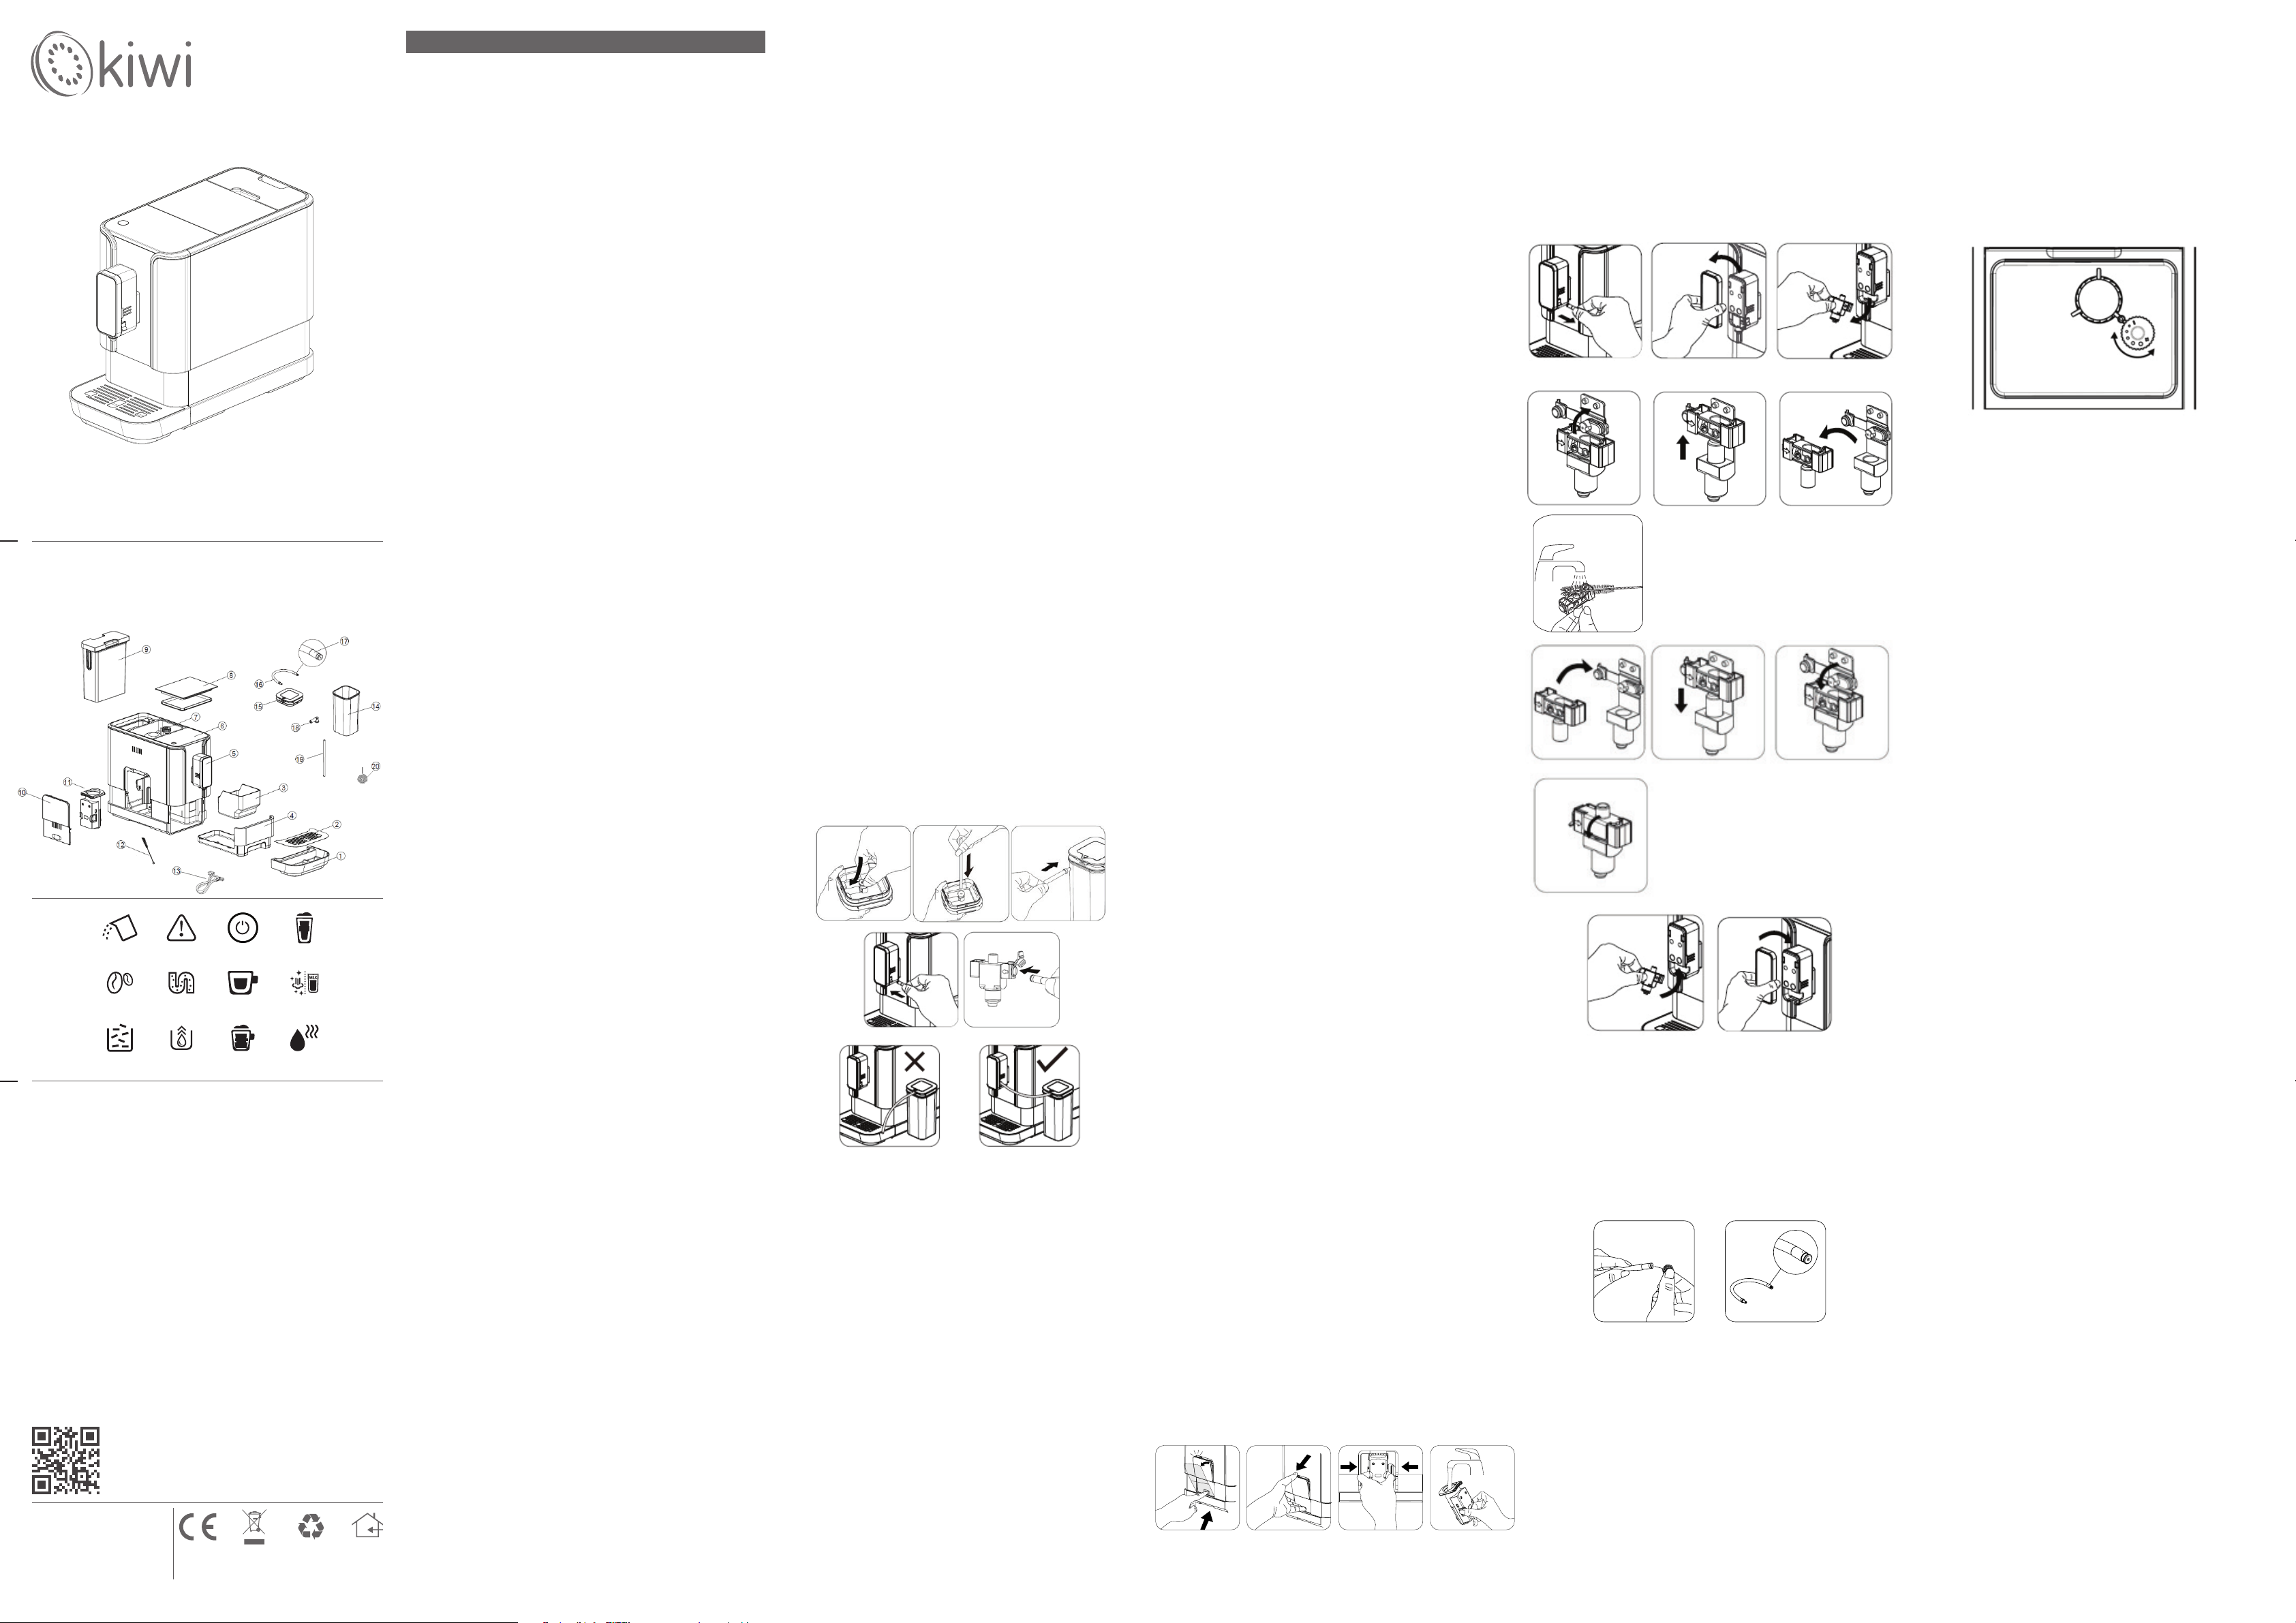
PARTS DESCRIPTION
1.External Drip Tray 2.Drip Tray Cover
3.Coee Grounds Container 4.External Drip Tray
5.Adjustable coee spout 6.Control Panel
7.Coee Bean compartment 8.Coee Beans Container Cover
9.Water Tank 10.Service Door
11.Brewer 12.Cleaning brush
13.Power cord 14.240ml Milk container
15.Milk container lid 16.Connection milk tube
17.Milk tube connector 18.Connection rubber
19.Container milk tube 20.Needle
CONTROL PANEL INDICATORS
C1. Flashing: Low water level/ Water tank missing
C2. Lack of bean
C3. Lights up stably: coee grounds container is full
Flashing: Internal Drip Tray/coee grounds container is missing
C4. Lights up stably: Brewer is missing/ installed improperly
Flashing: Service door is opened / installed improperly
C5. Lights up stably: Requires to do descaling
Flashing: Descaling is under process
C6. Empty System Function is running
C7. Power ON/OFF Button
C8. Espresso Button
C9. Cappuccino Button
C10. Latte Macchiato Button
C11. Clean / Milk Foam Button
C12. Hot water Button
BEFORE THE FIRST USE
1. Remove any protective lms, stickers and other packing materials on the
appliance.
2. Choose a safe and stable surface with an easily reachable power supply.
Allow minimum distances from the sides of machine.
3. Insert the external drip tray to the machine until it is secured.
4. Fill the water tank with water
5. Fill the container with coee beans
6. Unwind and straighten the power cord. Insert the plug into socket located
on the back of machine, while the other end of power cord to wall socket with
correct power voltage.
/
Technical Data / Données Techniques / Technische Daten /
Dati Tecnici / Datos Técnicos / Dados Técnicos / Teknik Bilgi /
Технические данные
Power supply / Source de courant / Energieversorgung / Alimentazione
elettrica / Fuente de alimentación / Fonte de energia / Güç kaynağı /
Источник питания
AC220-240V, 50/60Hz,
Power consumption / Consommation d’énergie / Energieverbrauch /
Consumo di energia / El consumo de energía / Consumo de energia /
Güç tüketimi / Потребляемая мощность
1235W-1470W
KCM-7599
kiwi-home.com
Manufacturer-Importer/
İmalatçı-İthalatçı
BMVA Elektronik San. ve Tic. A.Ş.
Osmangazi Mh, 2644. Sk. No:3/2
Kıraç-Esenyurt / Istanbul – TURKEY
Üretimi Üretimi/PD: 06-2024/K3597
Made in Turkey / Fabriqué en Turquie / Gemaakt in Turkije /
Hergestellt in der Türkei / Prodotto in Turchia / Fabricado en Turquía
/ Proizvedeno u Turskoj /
/
Türkiye Üretimi.
Fully Automatic Coee Machine (Espresso coee maker)
Tam Otomatik Kahve Makinesi
Cafetière Entièrement Automatique
EN
TR
FR
Instruction Manual
Kullanım Kılavuzu
Mode D'emploi
EN
TR
FR
NOTE: Press Hot Water button (see “Manual Rinsing”) to clean inside of the coee
machine before the rst use.
USE
When is ashing, the water tank is in low water level and requires to be lled up.
1. Lift the water tank using the lid as handle.
2. Rinse the water tank with fresh water. Fill the tank to the MAX level and place it
back into the machine. Make sure it is installed properly.
NOTE: To prevent overowing from water tank, do not add water directly into the
appliance.
IMPORTANT: Never ll the water tank with warm, hot, sparkling water or other
liquids which may damage the water tank and machine.
Filling Bean Container: When is ashing, the appliance requires to be lled with
coee beans:
1. Remove the bean container lid
2. Fill the bean box with coee beans.
3. Install the container lid.
IMPORTANT: Fill the bean container with coee beans only. Grounded, instant,
caramelized coee or other objects may damage the machine.
Tip: Depend on your choice, you can use the large bean container accessory to
enlarge the bean container as below:
PREPARING ESPRESSO
1. Switch on the appliance by pressing the power ON/OFF button (C7) . Make
sure the drip tray under the coee spout and water tank with water inside. The
appliance will perform auto-rinsing for a small cup of water, you can stop it by
pressing Clean/Milk Foam Button (C11) .
2. The appliance is then in the standby condition.
3. Place a cup under the coee spout and adjust the height of the spout to t the
cup. Depending on the size of the cup (too tall or too wide), the drip tray can be
removed or adjusted the position as below:
4. The Espresso button (C8) being pressed will light on and the illuminator will
light up indicating that the appliance is preparing the cup of coee.
5. When the appliance is back to standby condition, the coee is ready to serve.
Tip: The auto rinsing would not appear if the appliance is just switch o for a while.
You can deactivate this function by following steps and activate this function by
same way.
Step1: remove the service door.
Step2: press On/O button until a bit sound appear.
Note: Press the hot water button to clean inside of the coee maker before rst
use.
Assembling Automatic Milk Froth System
1. Clean the automatic milk froth system before rst use.
2. There is a protective cover for the milk tube connector inlet, just take it o when
you need to insert the milk tube connector.
Preparing Cappuccino
1. Install automatic milk froth system on machine as in “Assembling Automatic
Milk Froth System”.
2. Fill milk in the milk container and close the lid.
NOTE: Always use cold milk (approximately 5°C/41°F) with a protein content of at
least 3% to ensure an optimal frothing result.
3. Make sure the drip tray under the coee spout and water tank with water
inside. The appliance will perform auto-rinsing for a small cup of water, you can
stop it by pressing Clean/Milk Foam Button (C11) .
4. Place a cup under the coee spout. Press the Cappuccino button (C8) . The
button lights indicating coee preparation. It will rst dispense milk then coee.
5. Preparation will stop automatically. If you want to stop, press the button again
during the operation.
6. Remove milk container from machine and put it in the fridge.
7. After use, see chapter “Daily Cleaning of the Coee Machine” to clean the
automatic milk froth system and milk container.
WARNING:
• Steam and hot milk may spray out of the nozzle when starting to brew.
• Place the connecting rubber hose around the container lid after use. Do not let it
fall freely to prevent milk spraying out due to pressure dierence.
Preparing Latte Macchiato
1. Install automatic milk froth system on machine as in “Assembling Automatic
Milk Froth System”.
C1 C7C4 C10
C2 C8C5 C11
C3 C9C6 C12
2. Fill milk in the milk container and close the lid.
NOTE: Always use cold milk (approximately 5°C/41°F) with a protein content of at
least 3% to ensure an optimal frothing result.
3. Make sure the drip tray under the coee spout and water tank with water inside.
The appliance will perform auto-rinsing for a small cup of water, you can stop it by
pressing Clean/Milk Foam Button (C11) .
4. Place a cup under the coee spout. Press the Latte Macchiato button (C10) . The
button lights indicating coee preparation. It will rst dispense milk then coee.
5. Preparation will stop automatically. If you want to stop, press the button again
during the operation.
6. Remove milk container from machine and put it in the fridge.
7. After use, see chapter “Daily Cleaning of the Coee Machine” to clean the
automatic milk froth system and milk container.
WARNING:
• Steam and hot milk may spray out of the nozzle when starting to brew.
• Place the connecting rubber hose around the container lid after use. Do not let it
fall freely to prevent milk spraying out due to pressure dierence.
Preparing Milk Foam
1. Install automatic milk froth system on machine as in “Assembling Automatic
Milk Froth System”.
2. Fill milk in the milk container and close the lid.
NOTE: Always use cold milk (approximately 5°C/41°F) with a protein content of at
least 3% to ensure an optimal frothing result.
3. Make sure the drip tray under the coee spout and water tank with water inside.
4. Place a cup under the coee spout. Press Clean/Milk Foam button (C11) twice.
The button lights during preparation.
5. Preparation will stop automatically. If you want to stop, press the button again
during the operation.
6. Remove milk container from machine and put it in the fridge.
7. After use, see chapter “Daily Cleaning of the Coee Machine” to clean the
automatic milk froth system and milk container.
WARNING:
• Steam and hot milk may spray out of the nozzle when starting to brew.
• Place the connecting rubber hose around the container lid after use. Do not let it
fall freely to prevent milk spraying out due to pressure dierence.
Preparing Hot water
1. Place a cup under the coee spout.
2. Press Hot Water button (C12) . The button lights indicating the appliance is
heating up water.
3. Preparation will stop automatically. If you want to stop hot water during
operation, press the button again.
Quick Clean
It is used to clean the brewing unit and water channel.
1. Place a cup under the coee spout. Press Clean/Milk Foam button (C11) .
2. Water will clean the brewing unit and dispense from spout.
3. Around a cup of water will be dispensed. It will stop automatically, or you can
press the Clean/Milk Foam button to stop.
IMPORTANT: Remove the milk tube connector from the dispensing spout milk
frother inlet
Daily Cleaning of the Coee Machine
Timely cleaning and maintenance of the appliance is very important to prolong
the life of the appliance.
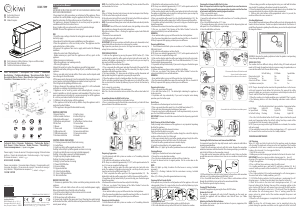
Cleaning Drip Tray and Coee Grounds Container
Empty and clean the drip tray every day.
1. Pull the external drip tray out of the machine. Empty the water left in drip tray
and rinse with fresh water. Dry it afterwards.
2. Slides open internal drip tray and coee ground container. Empty the coee
ground container and rinse with fresh water. Dry it afterwards.
3. Put back the coee grounds container in internal drip tray.
4. Secure the external drip tray at its original position.
NOTE: When (C3) lights up, the coee ground container needs to be emptied.
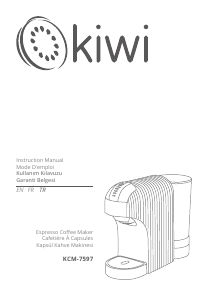
Cleaning Brewer
1. Slightly press the bottom of service door to open it.
2. Take out the service door from machine.
3. Press the release knob on brewer and take out. Rinse it under tap.
4. Insert the brewer back to its original position. Put the service door on the
machine.
NOTE:
When (C4) lights up stably, it indicates that the brewer is missing / installed
improperly.
When (C4) is ashing, it indicates that the service door is missing / installed
improperly.
When (C3) is ashing, the coee ground container is missing.
Cleaning Coee Powder Outlet
Coee powder may stick on the wall of powder outlet for appliance after used
a long period of time. It is suggested to clean the outlet by following step to
ensure that coee powder can come to brewer.
Cleaning Water Tank
1. Lift the water tank out of the machine and rinse with fresh water.
2. Fill it with drinkable water up to the MAX level. Put it back in the machine.
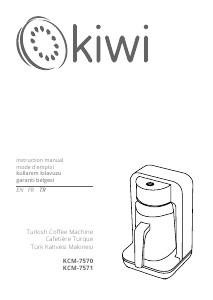
Cleaning the Automatic Milk Froth System
Note: it is important to do this step after a period of non-use of maximum
30 minutes after your milk recipe preparation to make sure the function
of automatic milk frother running in good condition.
1. Place a cup under the spout.
2. Fill the milk container with fresh water.
3. Connect the milk container to the coee machine as in “Assembling Automatic
Milk Froth System”.
4. Press Clean/Milk Foam button (C11) twice.
5. The machine dispenses hot water and steam to wash the dispensing tube and
milk spout. Press Clean/Milk button again to stop.
6. Clean the milk frother with water.
Take out the spout cover and remove the milk frother
Disassemble the milk frother and
clean it with clean water.
Clean the milk residues with a brush
.
Assemble the milk frother to rubber part.
Insert the milk frother to coee machine.
Cleaning the Milk Container and Connection Milk Tube
It is important to perform this step daily to make sure the automatic milk frother
running in good condition.
1. Empty the milk container and wash with fresh water. Remove the connection
rubber and container milk tube from lid. After cleaning and drying, assemble the
parts to the lid. Make sure the connection is correct.
2. Clean both ends of connection milk tube with fresh water. Make sure the hole
on milk tube connector as below is clean. You can use a needle or a brush to clean
the hole.
3. Fill the milk container with fresh water. Connect to the machine with connection
milk tube as in “Assembling Automatic Milk Froth System”.
4. Press Clean/Milk Foam button (C11) twice. Water in milk container will run
through the milk froth system and clean the connection milk tube.
Press the button again to stop the cleaning.
Turning O the Machine
Switch o the appliance by pressing the Power ON/OFF button.
Automatic Shut-o
The appliance is equipped with auto shut-o. Depending on the mode you
selected, the appliance will have dierent auto shut-o times (see “Mode
Selection”).
Adjusting Coee/Hot Water Volume
The machine can memorize your desired volume of espresso, cappuccino, latte
macchiato and hot water.
1. When making your coee or dispensing hot water, press and hold the button
you selected. The appliance will continue to make the cup of coee.
2. When the volume of coee meets your desired volume, release the button. Two
beep sounds indicates the volume of coee is being memorized.
3. Coee or hot water buttons will be programmed: when it is pressed, the
machine will brew the same amount set.
Grinding Adjustment
You can adjust the grinder to choose dierent coee roast levels by turning adjuster
knob in the bean container. The dots on adjuster knob indicate the neness of
grind.When the grinder is grinding the coee bean, you can turn the adjuster knob
to change the neness.
WARNING: Never do the grinding adjustment when the grinder is not operating.
It may damage the grinder.
MODE SELECTION
The machine has three dierent settings: default setting, ECO mode and speed
mode. In ECO mode, the appliance helps to save more energy. In speed mode, user
can make their coee faster than in default setting.
Default Setting ECO Mode Speed Mode
Illumination Light Yes No Yes
Pre-brewing* Yes Yes No
Auto shut-o time 20 mins 10 mins 30 mins
Cup Volume memoryYes Yes Yes
NOTE: The pre-brewing function moistens the grounded beans in the brewer
with small amount of water before full extraction. This expands the coee
grounds to build up a greater pressure in brewer which help extraction of all
the oils and full avor from the grounded beans.
1. When the machine is in standby condition, press and hold (C7)for 5 seconds.
2. The following buttons will show following indications under dierent
settings:
Latte Macchiato button Espresso button Cappuccino button
In ECO Mode Lights ON Flashing Flashing
In Speed Mode Flashing Lights ON Flashing
In Default Setting Flashing Flashing Lights ON
3. Press the Latte Macchiato button for ECO mode, Espresso button for speed
mode and Cappuccino button for default setting. Two Beep sound will be
heard indicates that the mode is being selected.
NOTE: If you are pressing irrelative Light ON button in each mode, the machine
will not respond.
4. If you would like to remain the setting unchanged, press (C7) again or wait
for 5 seconds for the machine to return to standby condition.
CLEANING & MAINTENANCE
Self-Cleaning
When (C5) lights up stably, it indicates that the appliance needs to undergo
self-cleaning. The appliance will remain in the best condition if this function
is performed at least once a month or more regularly depending on the
hardness of water used. It is also suggested that to
1. Fully ll the water tank.
2. Adding one pack of cleaning agent included in the box to the water tank.
IMPORTANT: Do not use vinegar or other cleaning agent to do self-
cleaning of this appliance. The cleaning agent might damage the appliance.
3. Plug in the appliance.
4. Place a sucient large container under the coee spout.
5. In standby condition, press and hold (C7) and Espresso button (C8) for 5
seconds. Two Beep sounds will be heard with (C5) and Espresso button will
be ashing.
6. Press Espresso button (C8) to conrm undergoing the self-cleaning process.
To resume back to the standby condition, press (C7) .
7. (C5) Will be ashing indicates that the appliance is undergoing the self-
cleaning process. (Caution: Keep skin/body away from the hot water.)
8. When all the water in the water tank is being dispensed out, (C1) and
Espresso button will be ashing. Remove all the remaining solution in the
water tank and ll the tank with normal tap water until the MAX position.
When water is lled into the water tank, (C1) will go o. Then the appliance
will continue the self-cleaning process. There is waiting period for this
process, please be patient and let the machine complete the process and
don’t stop manually.
9. When the self-cleaning process is completed, the appliance will switch o
automatically.
NOTE: To ensure the self-cleaning process can be completed, please be
patient during the operation and make sure the applicant will be switch o


Bu ürün hakkındaki sohbete katıl
Burada Kiwi KCM-7599 Kahve makinesi hakkında ne düşündüğünüzü paylaşabilirsiniz. Bir sorunuz varsa öncelikle kılavuzu dikkatlice okuyun. Kılavuz talebinde bulunmak için iletişim formumuzu kullanabilirsiniz.