• Only use the device in-
doors.
• Do not use the device in ex-
treme environmental con-
ditions.
Safety informa-
tion
This device may be used
by children over the age
of 8 and by persons with
reduced physical, senso-
ry or mental abilities or
by those without experi-
ence and/or knowledge,
if they are supervised or
have been instructed in
the safe use of the device
and have understood the
potential risks.
• Children must not be
allowed to play with
the device.
• Keep the device and
its accessories out of
the reach of children.
DANGER!
Risk of suffoca-
tion!
There is a risk of suffoca-
tion from plastic packag-
ing!
You should therefore
keep plastic packaging
out of the reach of chil-
dren.
General information
WARNING!
Risk of injury
from electric shock/
risk of damage to the
device.
Check the device for
damage before using it
for the first time.
Do not use the device
if it is visibly damaged.
Do not make any un-
authorised modifica-
tions to the device or
try to open it and/or
repair it yourself. The
device does not con-
tain any parts that re-
quire maintenance.
If you identify any
transport damage,
please contact the Me-
dion Service Centre im-
mediately.
Power pack
WARNING!
Risk of inju-
ry from electric
shock!
Only use the mains
adapter model
KSAS0050500100VEU
for operating the IP
camera.
Only connect the
mains adapter to a
properly installed pow-
er socket. The mains
voltage should corre-
spond to the technical
data for the device.
The socket outlet must
be freely accessible so
that you can unplug
the device from the
mains quickly if neces-
sary.
Do not kink or crush
the mains cable.
If the mains adapt-
er, mains cable or the
camera are damaged
or if liquids or foreign
bodies enter the inte-
rior of the device, dis-
connect the mains
adapter immediately
from the socket.
To avoid overheating,
do not cover the mains
adapter.
Never touch the mains
adapter with wet
hands.
Avoid exposing the de-
vice to water droplets
or spray and do not
place any liquid-filled
containers (vases or
similar) near to the
device or the mains
adapter. Liquids pene-
trating the device may
impair the electrical
safety of the product.
Select a location for
the camera that is not
exposed to direct sun-
light and where the
image quality cannot
be damaged by other
reflected light.
Wall mounting
WARNING!
Risk of injury
from electric shock.
Select a suitable loca-
tion for installing the
device and take care
not to damage any
hidden electrical or in-
stallation cables when
drilling the holes.
Ensure when in-
stalling and align-
ing the camera
that you do not violate
any legally valid regula-
tions, especially data pro-
tection regulations,
householder’s rights and
regulations against the
surveillance of publicly
accessible areas.
Cleaning and care
Disconnect the mains
adapter from the sock-
et before cleaning.
Only use a dry, soft
cloth to clean the de-
vice.
Do not use any chem-
ical solutions and
cleaning products.
These may damage the
surface and/or the in-
scriptions on the de-
vice.
Package contents
Please check your purchase
to ensure that all items are in-
cluded. If anything is missing,
please contact us within 14
days of purchase.
The following items are sup-
plied with your product:
• 1 IP camera
• 1 mains adapter
(KSAS0050500100VEU,
Ktec) with microUSB cable
• Mounting material
• Operating instructions and
warranty documents
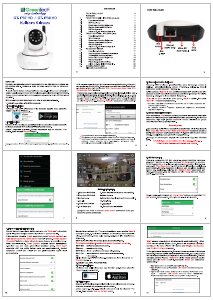
Setting up the IP
camera
Once you have installed
and opened the Medion
View Plus app, create a user
account to access the cam-
era under Registration.
Control via the Smart Home
app:
Then open the Smart Home
app and allow access to the
Medion View Plus app in
the Smart Home app un-
der Settings/Link to exter-
nal App.
You now have the option of
also controlling the camera via
the Smart Home app.
Setting up the cam-
era
Place the angled bracket
on the IP camera onto the
stand and turn it to the left
to secure the connection.
Insert a microSD card into
the card slot on the IP cam-
era with the contacts facing
towards the lens.
When setting up the IP
camera, ensure that it is lo-
cated within range of your
Wi-Fi router.
Plug the USB cable into the
USB connection on the IP
camera and the other end
into the mains adapter.
Plug the mains adapter into
a suitable socket.
The camera will emit an acous-
tic signal.
If mounting the camera on
the wall, ensure that the in-
stallation location is within
range of a mains socket.
Adding the IP cam-
era to the Medion
View Plus app
When using the IP camera
for the first time, start the
Medion View Plus app and
tap on the symbol.
Under Add Camera, select
the option Add WiFi.
Enter the device ID or scan
the QR code on the side of
the device.
Enter the network pass-
word.
The camera will emit two
acoustic signals and establish-
es the Wi-Fi connection.
Once a connection has been
successfully established, the
Medion View Plus app will dis-
play a list of connected cam-
eras.
Controlling the IP
camera
Tap on the image being trans-
mitted from the camera. The
following functions are availa-
ble for the selected IP camera:
HD SD
Switch between HD
and standard display
of the real-time video
Display the videos for
all connected IP cam-
eras
Video recording
(saved to your smart-
phone)
Switch the audio
transmission from the
smartphone to the IP
camera on/off
Take a photo (saved to
your smartphone)
Switch the audio
transmission from
the IP camera to the
smartphone on/off
Transfer data from the
microSD card in the IP
camera to the smart-
phone
Selecting the settings
Selecting the set-
tings
Tap on the symbol to select
the settings for the connected
IP camera.
The following functions are
available:
Wi-Fi settings
Select the network and en-
ter the network password
Flip the image horizontally
Swipe the slide control
to the right to flip the re-
al-time image horizontally.
Flip the image vertically
Swipe the slide control
to the right to flip the re-
al-time image vertically.
Manually taking a photo/re-
cording (only possible with a
microSD card)
Swipe the slide control to the
right to manually take a photo/
recording.
Motion sensor
Tap on this button to select
the sensitivity of the mo-
tion sensor: high, medium,
low or off.
Recordings and photos
that are triggered by
the motion sensor are
automatically saved to the mi-
croSD card.
Device information
Information on the IP camera
(hardware and software, con-
nection data).
Indicator light
display
The indicator light on the cam-
era shows the status of the
camera.
The indicator light ...
lights up
permanent-
ly in red:
No Internet
connection
flashes in
red:
Network con-
nection being
established
flashes in
green:
Network con-
nection be-
tween cam-
era and router
successfully
established,
no server con-
nection
lights up
permanent-
ly in green:
Network and
server con-
nection estab-
lished
Resetting the IP
camera
If the IP camera no longer re-
sponds or if problems occur
with the network connection,
it may be necessary to reset it
to the factory settings.
Press and hold down the
SET button using a thin ob-
ject for approx. 10 seconds
to reset the IP camera to
the factory settings.
Troubleshooting
PROBLEM Possible cause Remedy
Wi-Fi connection
not possible.
LED flashes in red.
IP camera is outside the
range of the router
Position the IP camera nearer to the router.
Wi-Fi network not
found
Ensure a 2.4 GHz Wi-Fi connection is being
used, 5 GHz networks are not supported by
the IP camera.
Network name/pass-
word invalid
Do not use any special characters in the
network name. Ensure that the network
name and the password are not longer
than 16 characters.
The router is using
encryption that is not
supported
Set the router to use WPA2-PSK / WPA-PSK
AES encryption, TKIP encryption is not sup-
ported by the IP camera.
The name of the Wi-Fi
network is not being
transmitted
Ensure that the network name is not being
hidden by the router.
The IP camera has not
received an IP address
Set DHCP on the router.
The MAC address
for the IP camera is
blocked by the router
The MAC address for the camera must not
be blocked by the router, switch off the
MAC filter on the router or create an excep-
tion for the IP camera.
Internet connec-
tion not possible.
LED flashes in
green.
The router has no con-
nection to the Internet
Please check the Internet connection.
Technical data
General
Image sen-
sor
CMOS
Camera
resolution
720 P HD
Viewing
angle
70°
Night vision
range
< 5 m
Total weight
(approx.)
104 g
Operating
tempera-
ture
05 °C to 40 °C
Humidity
during op-
eration
5 % to 65 %
Dimensions: approx. 80 x 80 x 118 mm
Interfaces for wireless communication
WLAN
standard:
802.11 b/g/n
Power pack
Model:
KSAS-0050500100VEU
Manufac-
turer:
Ktec, China
Input volt-
age:
100 – 240 V~ 50/60 Hz 0.15 A
EN
Notes on how
to use these
instructions
Before using the device
for the first time, read
these operating instruc-
tions thoroughly and follow the
safety advice! This device may
only be used as described in the
operating instructions.
Always keep these operating
instructions at hand and store
them safely so that you can pass
them on to a new owner if you
sell the unit!
Warning symbols
and keywords used
in these instructions
DANGER!
Warning of im-
mediate mortal
danger!
WARNING!
Warning of pos-
sible risk of fa-
tal injury and/or
serious irreversi-
ble injuries!
CAUTION!
Warning: pos-
sible minor or
moderate inju-
ries!
NOTICE!
Please follow
the guidelines
to avoid proper-
ty damage!
Additional infor-
mation on using
the device!
NOTICE!
Please follow
the instructions
in the operating
instructions!
Proper use
The IP camera
is designed for
Wi-Fi controlled
room monitoring and is set up
via the free Medion View Plus
app.
The IP camera can be integrat-
ed into the Smart Home sys-
tem.
You can directly download the
free Smart Home app, as well
as the Medion View Plus app
for controlling the camera,
onto your smartphone from
the Google Play Store (for An-
droid smartphones) or the App
Store (for iPhones and iPads).
Please note that we shall not
be liable in cases of improp-
er use:
• Do not modify the device
without our consent and do
not use any auxiliary equip-
ment that we have not ap-
proved or supplied.
• Use only spare parts and ac-
cessories that we have sup-
plied or approved.
• Heed all the information
in these operating instruc-
tions, especially the safety
information. Any other use
is deemed improper and
can cause personal injury or
property damage.
Output
voltage:
5.0 V
1 A
Connec-
tions:
microUSB 2.0
Declaration of
conformity
Medion AG hereby
declares that the
product MD 87651
conforms to the following Eu-
ropean requirements:
• Directive 2014/53/EC
• EMC Directive 2014/30/EU
• Low Voltage Directive
2014/35/EU
• RoHS Directive 2011/65/EU
Full declarations of conformity
are available at www.medion.
com/conformity.
Disposal
Packaging
The device has been
packaged to protect it
from damage in tran-
sit. The packaging is made of
materials that can be recycled
in an environmentally friendly
manner.
Device
Do not dispose of the
device in the house-
hold rubbish at the
end of its service life.
Please enquire about the op-
tions for environmentally
friendly disposal.
Legal notice
Copyright © 2016
All rights reserved.
These operating instructions
are protected by copyright.
Mechanical, electronic and
any other forms of reproduc-
tion are prohibited without the
written permission of the man-
ufacturer.
Copyright is owned by the
company:
Medion AG
Am Zehnthof 77
45307 Essen
Germany
These operating instructions
can be reordered via the Ser-
vice Hotline and are also avail-
able for download from the
Service web page www.medi-
onservice.de.
You can also scan the QR code
below to download the in-
structions onto your mobile
device via the service portal.


Bu ürün hakkındaki sohbete katıl
Burada Medion E86651 (MD 87651) IP Kamerası hakkında ne düşündüğünüzü paylaşabilirsiniz. Bir sorunuz varsa öncelikle kılavuzu dikkatlice okuyun. Kılavuz talebinde bulunmak için iletişim formumuzu kullanabilirsiniz.