Mobile Projector
MP-CD1
© 2018 Sony Corporation
[c]
[d]
[b]
[a]
[e]
[f]
[g]
[h] [i] [j]
[k]
[l]
[m]
[p]
[o]
[q]
[n]
GB Operating Instructions
FR Mode d’emploi
DE Bedienungsanleitung
ES Manual de instrucciones
NL Gebruiksaanwijzing
IT Istruzioni per l’uso
PT Instruções de operação
CZ Návod k použití
HU Kezelési útmutató
PL Instrukcja obsługi
SK Návod na obsluhu
SI Navodila za uporabo
RO Instrucţiuni de utilizare
BG Инструкции за експлоатация
SE Bruksanvisning
DK Betjeningsvejledning
FI Käyttöohjeet
GR Οδηγίες λειτουργίας
RU Инструкция по эксплуатации
HR Upute za uporabu
UA Інструкції з експлуатації
NO Bruksanvisning
TR Kullanma Kılavuzu
SR Uputstva za korišćenje
C-261-051-11(1) • When the content of the connected device is projected:
(dynamic picture) (standard picture)
(Currently appearing sound mode (unmuted) or (muted) does not
change.)
Supplying Power from the Projector to
Another Device
1. Connect a device to the USB OUT jack [p] using an optional USB cable.
The
(charge) lamp [n] lights up (green).
Tips
•Supplying power to another device is possible even while the projector is being
used.
•While supplying power to another device, you can charge the projector through the
USB-C IN jack [o] at the same time. Note that the remaining battery power may
decrease even while charging depending on the AC adaptor capability or projecting
content.
Notes
•When an MHL-compatible smartphone or tablet is connected to the HDMI/MHL IN
jack [q], the power is supplied to the connected MHL-compatible device through the
HDMI/MHL IN jack and the power supply from the USB OUT jack [p] stops.
•When the remaining battery power of the projector is low, the
(charge) lamp
[n] keeps blinking (orange) until eventually the projector shuts down.
•The USB OUT jack [p] can only be used to supply power to another device and
cannot be used to charge the projector. To charge the projector, use the USB-C IN
jack [o].
•The USB OUT jack [p] is for output only. Do not connect the USB OUT jack to a USB
jack that outputs power such as a one on a computer. Doing so may cause a
malfunction.
•If the connected HDMI device is sleeping, the projector may stop supplying power to
the device automatically after a certain period of time. Disconnect the USB cable
from the USB OUT jack [p] and reconnect it to supply power again.
Troubleshooting
The power does not turn on.
q If the remaining battery power is low or insufficient, charge the battery.
q Use the projector in a location with an ambient temperature between 0 °C and
35 °C.
q Try turning the power off and on again.
The projector does not charge.
q The USB OUT jack can only be used to supply power to another device and
cannot be used to charge the projector. To charge the projector, use the USB-C
IN jack.
The projector automatically shuts down during use.
q The remaining battery power is low. Charge the battery.
q The projector automatically shuts down when it overheats. Let it cool down
before you operate it again.
q When the projector is in use, connected via MHL and powered by AC adaptor,
the rate of power consumption may be more than the rate of charge.
Depending on the remaining battery power, the projector may shut down. If this
happens, disconnect the MHL connection and charge the projector.
The (power) lamp (white) and the
(charge) lamp (red) blink at the same
time.
q An internal error may have occurred. Try turning the power off and on again.
The
(charge) lamp is blinking (orange).
q The remaining battery power is low. Charge the battery.
No images are projected.
q Check that the cable, connector and/or adaptor are connected correctly.
q Some image formats may not be available depending on the connected device
or the connection method.
There is no sound.
q Check the volume level of the connected device.
q Some sound formats may not be available depending on the connected device
or the connection method.
The
(charge) lamp blinks (red) while the projector is supplying power to
another device via the USB OUT jack.
q The USB-C cable (supplied) may not be connected correctly. Disconnect it and
reconnect.
q The specifications of the connected device may not meet the requirements.
Check the charging specifications of the device.
The image is a trapezoidal shape.
q The projector automatically corrects the vertically distorted image. However, if
the distortion is too large, this function may not work sufficiently. Also, the
horizontally distorted image will not be corrected. In such cases, move the
projector to adjust the projection angle.
The projected image is unclear.
q Adjust the focus using the focus adjuster. The screen size of which the focus is
adjustable is from 20 inches to 120 inches.
The fan has started making loud noise.
q Stop use and contact your Sony dealer or authorized Sony service facility.
Other devices cannot connect to the projector.
q Not all video devices have HDMI connectivity or MHL connectivity. To see if your
video device has any of these capabilities, check its specifications or contact the
manufacturer.
The projector stops responding.
q Press the power button for more than 10 seconds. Do this operation only when
the projector freezes. Do not use this operation under normal circumstances.
Specifications
Design and specifications are subject to change without notice.
Dimensions: Approx. 83.0 mm × 16.0 mm × 150.0 mm (W/H/L) (without protrusions)
Weight: Approx. 280 g
Operating temperature: 0 °C to 35 °C
Output resolution: 854 × 480
Audio output: Ф3.5 Audio Jack
Speaker output: 1.0 W
HDMI/MHL input: HDMI 1.4b/MHL 1.4 (HDCP1.4)
Projected image size: 40 inches(1.02 m) at projection distance of 1.15 m/Max. 120 inches(3.05
m) at projection distance of 3.45 m
Brightness: ANSI 105 lumens
Color reproducibility: Full color (16,770,000 colors)
Aspect ratio: 16:9
Contrast ratio: 400:1
Continuous projecting time: Approx. 120 minutes (when fully charged and without power
supply)
Light source life: Approx. 50,000 hours
Input: DC 5 V/3.0 A
Li-ion Battery: 3.8 V, 5,000 mAh
Charging time: Approx. 2.5 hours (from CP-AD3 (sold separately))
Approx. 4 hours (with 1.5 A power supply)
Output: DC 5 V/1.5 A, 1 port
Notes on Use
•Before use, take the projector out of the carrying pouch. When taking out, hold the
projector firmly.
•Do not operate the unit if it has been wet or damaged. Otherwise, it can lead to
electric shock, explosion and/or injury.
•When using a TV, radio or tuner, interference may occur. Do not set up the projector
in close proximity to these products.
•Use the projector on a stable and flat surface.
•Do not use the projector in humid, dusty or sandy conditions. Dust or sand may enter
through the ventilation holes on the bottom of the projector and cause a
malfunction.
•Do not block the ventilation holes with hands, etc. This is dangerous and may cause
the projector to overheat.
•Do not put any foreign objects in the ventilation holes.
•Do not insert your fingernails into the ventilation holes and other jacks, nor hook
your fingernails on the gaps while using the projector.
•Do not short-circuit the projector. Do not allow metal objects such as hairpins to
come into contact with the projector or its jacks.
•Do not disassemble or modify the projector.
•The battery is built into the projector and cannot be removed.
•Do not place the projector in a fire, nor heat it in a microwave oven or oven.
•Do not allow the projector to get wet with fresh water, sea water, milk, soft drinks or
soap water. Do not use the projector while wet.
•Do not use or store the projector in a place where the temperature is extremely high,
such as near a fire, under direct sunlight, near a heater or in a car parked in the sun.
•Do not use the projector in a place with poor ventilation, such as while wrapped in a
quilt/blanket or in a bag.
•Do not expose the projector to a strong impact. Avoid hitting it with a hammer,
putting any heavy object on top, stepping on it or dropping it.
•Avoid continuous contact between your skin and the projector while charging it or
during use. Doing so may cause a low-temperature burn injury. Be careful of heat
transmitted through clothes as it may also cause a low-temperature burn injury.
•Before connecting a portable device to the projector, attach the portable device’s
battery pack. Connecting a portable device while its battery is removed may cause
loss of data or damage to the portable device.
•Do not touch or stick your finger into the connection parts.
•Refer also to the manual of the device that you use in conjunction with the projector
as you may need to operate the device in order to use it with the projector.
•When the projector body is overheated from use, the
(charge) lamp blinks
rapidly (orange or green). In this case, stop using the projector.
•Use the projector in a place where there is no dust or cigarette smoke because the
projector is a sensitive device.
•Do not place the projector close to credit cards or other cards. Doing so may result in
the loss of recorded data.
•If the projection lens is not clean, wipe it with a soft cloth such as an eyeglass
cleaning cloth.
•Do not store the projector in a humid or dusty place.
•Remove cables from the projector after use or while not in use.
•Check the connections of the projector periodically to make sure dust does not
accumulate.
•Children should only use the projector under adult supervision. Keep the projector
out of reach of infants.
•It is recommended that you maintain a distance of more than 1.5 times the diagonal
length of the screen. If you watch the screen at a close distance for a long time, your
eye sight may become worse.
•EHV (exposure hazard value); 3.17 HD (hazard distance); 0.76 m
•The projected light of the projector is categorized as Risk Group 2 (RG2) based on
IEC62471-5:2015.
•Sony is not liable for damage or loss resulting from the use of the projector, or for
any claim from a third party.
•Sony is not liable for PC, cell phone or other hardware problems that arise from use
with the projector; compatibility of the product with specific hardware, software or
peripherals; operating conflicts with other installed software; data loss; or other
accidental or unavoidable damages.
•Sony is not liable for financial damages, lost profits, claims from third parties, etc.,
arising from the use of the projector.
•If a malfunction occurs, stop use and contact your Sony dealer or authorized Sony
service facility.
•It has been reported that some portable devices may incur a sudden loss of data
that is saved in the memory, regardless if the data is used with the projector or not
(for details, refer to the user manual supplied with the portable device). Before using
the projector, be sure to back up data that is saved in the memory. Sony is not liable
for loss of data.
Trademarks
•The terms HDMI and HDMI High-Definition Multimedia Interface, and the HDMI Logo
are trademarks or registered trademarks of HDMI Licensing Administrator, Inc. in the
United States and other countries.
•MHL, Mobile High-Definition Link and the MHL Logo are trademarks or registered
trademarks of MHL Licensing, LLC.
•DLP® and the DLP logo are registered trademarks of Texas Instruments.
•DLP IntelliBright™ is a trademark of Texas Instruments.
•USB Type-C™ and USB-C™ are trademarks of USB Implementers Forum, Inc.
•In addition, system and product names used in this manual are, in general,
trademarks or registered trademarks of their respective developers or manufacturers.
However, the ™ or ® marks are not used in all cases in this manual.
•iPhone and iPad are trademarks of Apple Inc.
•“PlayStation” is a registered trademark or trademark of Sony Interactive
Entertainment Inc.
The year and month of manufacture is printed on the bottom of this product at the left. The
first four digits stand for the year and the last two stand for the month.
MSP Driver Library
License: BSD
Copyright © 2013, Texas Instruments
All rights reserved.
Redistribution and use in source and binary forms, with or without modification, are permitted
provided that the following conditions are met:
1. Redistributions of source code must retain the above copyright notice, this list of conditions
and the following disclaimer.
2. Redistributions in binary form must reproduce the above copyright notice, this list of
conditions and the following disclaimer in the documentation and/or other materials
provided with the distribution.
3. Neither the name of Texas Instruments nor the names of its contributors may be used to
endorse or promote products derived from this software without specific prior written
permission.
THIS SOFTWARE IS PROVIDED BY THE COPYRIGHT HOLDERS AND CONTRIBUTORS “AS IS” AND
ANY EXPRESS OR IMPLIED WARRANTIES, INCLUDING, BUT NOT LIMITED TO, THE IMPLIED
WARRANTIES OF MERCHANTABILITY AND FITNESS FOR A PARTICULAR PURPOSE ARE
DISCLAIMED. IN NO EVENT SHALL THE COPYRIGHT HOLDER OR CONTRIBUTORS BE LIABLE FOR
ANY DIRECT, INDIRECT, INCIDENTAL, SPECIAL, EXEMPLARY, OR CONSEQUENTIAL DAMAGES
(INCLUDING, BUT NOT LIMITED TO, PROCUREMENT OF SUBSTITUTE GOODS OR SERVICES; LOSS
OF USE, DATA, OR PROFITS; OR BUSINESS INTERRUPTION) HOWEVER CAUSED AND ON ANY
THEORY OF LIABILITY, WHETHER IN CONTRACT, STRICT LIABILITY, OR TORT (INCLUDING
NEGLIGENCE OR OTHERWISE) ARISING IN ANY WAY OUT OF THE USE OF THIS SOFTWARE, EVEN
IF ADVISED OF THE POSSIBILITY OF SUCH DAMAGE.
Disposal of waste batteries and electrical and electronic equipment (applicable in the
European Union and other countries with separate collection systems)
This symbol on the product, the battery or on the packaging indicates that the
product and the battery shall not be treated as household waste. On certain
batteries this symbol might be used in combination with a chemical symbol.
The chemical symbol for lead (Pb) is added if the battery contains more than
0.004% lead. By ensuring that these products and batteries are disposed of
correctly, you will help to prevent potentially negative consequences for the
environment and human health which could be caused by inappropriate
waste handling. The recycling of the materials will help to conserve natural resources. In case
of products that for safety, performance or data integrity reasons require a permanent
connection with an incorporated battery, this battery should be replaced by qualified service
staff only. To ensure that the battery and the electrical and electronic equipment will be
treated properly, hand over these products at end-of-life to the appropriate collection point
for the recycling of electrical and electronic equipment. For all other batteries, please view the
section on how to remove the battery from the product safely. Hand the battery over to the
appropriate collection point for the recycling of waste batteries. For more detailed information
about recycling of this product or battery, please contact your local Civic Office, your
household waste disposal service or the shop where you purchased the product or battery.
This product has been manufactured by or on behalf of Sony Corporation.
EU Importer: Sony Europe Limited.
Inquiries to the EU Importer or related to product compliance in Europe should be sent to the
manufacturer’s authorized representative, Sony Belgium, bijkantoor van Sony Europe Limited,
Da Vincilaan 7-D1, 1935 Zaventem, Belgium.
FR (Français)
Avant d’utiliser le projecteur, veuillez lire attentivement les
instructions suivantes et conservez ce manuel à des fins de
référence ultérieure.
ATTENTION
• Ne regardez pas la lampe quand elle fonctionne. Cela risquerait d’endommager vos
yeux.
• Ce produit peut émettre des radiations optiques dangereuses.
Vérification du produit et des accessoires fournis
• Projecteur (1)
• Câble USB-C™ (1)
• Adaptateur micro-USB à USB-C (1)
• Câble HDMI™ haute vitesse avec Ethernet (1)
• Étui de transport (1)
• Mode d’emploi (ce manuel, 1)
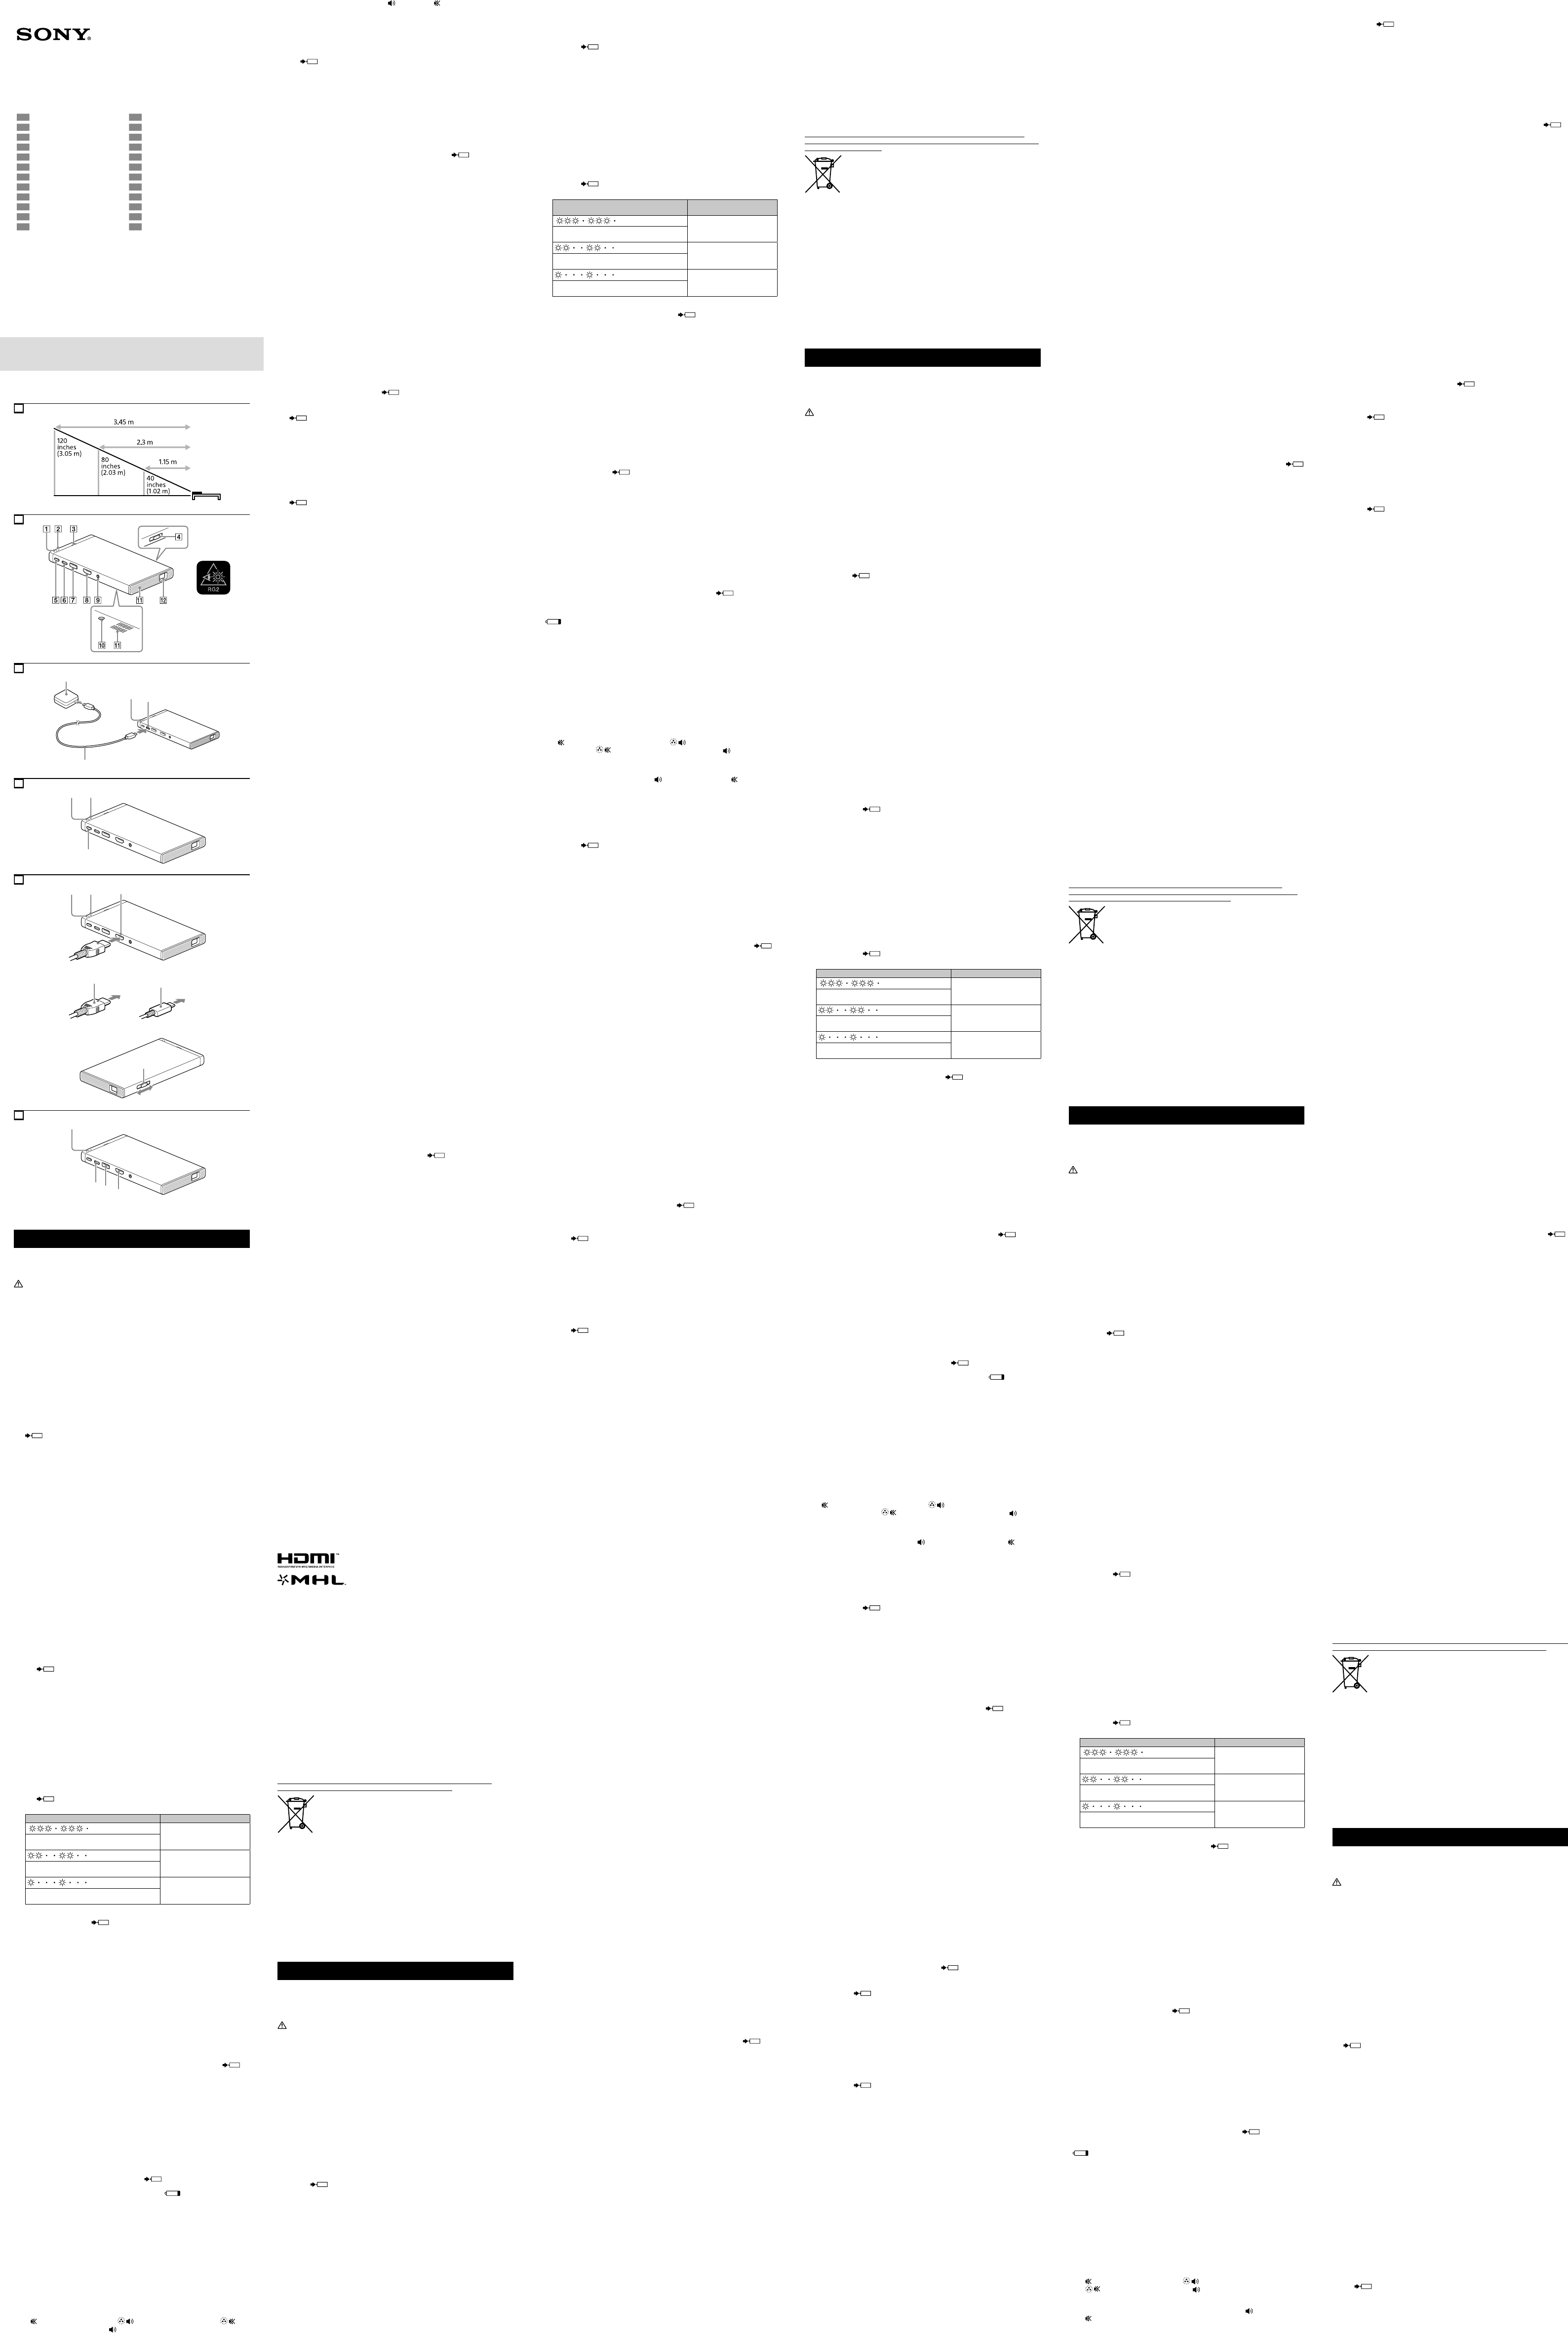
Distance et taille d’écran
L’illustration représente la manière dont la taille d’écran change en fonction de la
distance à partir du projecteur.
Pièces et commandes
Témoin (charge) (Voir , , et .)
S’allume ou clignote en orange, vert ou rouge pour indiquer l’état du projecteur.
Témoin (alimentation) (Voir et .)
S’allume ou clignote en blanc quand le projecteur est sous tension.
Haut-parleur
Reproduit le son d’un périphérique connecté. Pour régler le volume, utilisez la
commande de volume du périphérique connecté.
Commande de réglage de la mise au point (Voir .)
Touche (alimentation) (Voir .)
Prise USB-C IN (Voir et .)
Permet de charger le projecteur.
Prise USB OUT (Voir .)
Permet d’alimenter un autre périphérique en tension à partir du projecteur.
Prise HDMI/MHL IN (Voir et .)
Raccordez-la à un périphérique HDMI ou MHL pour la projection.
Prise AUDIO OUT
Raccordez-la à un casque ou à des hauts-parleur.
Orifice pour prise de trépied
Orifices de ventilation
Objectif de projection
Charge du projecteur
1. Raccordez le câble USB-C fourni [b] à la prise USB-C IN [d] et à un adaptateur
secteur en option [a].
2. Raccordez l’adaptateur secteur [a] à une prise murale.
Le témoin
(charge) [c] s’allume (en orange) pendant la charge et s’éteint
quand la charge est terminée (ou que l’alimentation est débranchée).
Conseils
•Lorsque vous utilisez le câble USB-C [b] pour charger le projecteur, le projecteur se
charge quand il est sous ou hors tension. Il est possible d’effectuer la charge à l’aide
d’un adaptateur secteur de sortie USB de 5 V 3.0 A ou supérieur. Veuillez noter que
le courant d’entrée maximum de ce module est 3.0 A.
•Si vous possédez un câble micro-USB et son adaptateur secteur (non fournis l’un et
l’autre), vous pouvez les utiliser pour charger le projecteur en raccordant le câble
micro-USB à l’adaptateur micro-USB à USB-C fourni. Cependant, l’alimentation de
charge du projecteur peut atteindre 1.5 A. En cas de projection continue pendant la
charge du projecteur, il se peut que celui-ci s’arrête à cause d’une diminution de la
charge de la batterie.
Contrôle de la capacité restante de la batterie
1. Appuyez sur la touche (alimentation) [g] et relâchez-la rapidement (en moins
de 1 seconde) quand l’alimentation est hors tension.
Le témoin
(charge) [e] clignote (en orange) selon un des motifs suivants en
fonction de la capacité restante de la batterie.
Motif de clignotement du témoin
Capacité restante de la
batterie
70% à 100%
(Clignote 3 fois, puis à nouveau 3 fois après un
délai spécifique.)
30% à 70%
(Clignote 2 fois, puis à nouveau 2 fois après un
délai spécifique.)
0% à 30%
(Clignote 1 fois, puis à nouveau 1 fois après un
délai spécifique.)
Remarque
•Quand l’alimentation est tous tension, le témoin
(charge) affiche la capacité
restante de la batterie lorsque vous changez de mode son/image (voir ci-dessous).
Mise sous tension
1. Appuyez sur la touche (alimentation) [g] et maintenez-la enfoncée pendant
plus d’une seconde.
Le témoin (alimentation) [f] s’allume (en blanc).
Pour mettre le projecteur hors tension, appuyez sur la touche (alimentation) [g]
et maintenez-la enfoncée pendant plus d’une seconde.
Raccordement d’un périphérique et
projection de son contenu
1. Raccordez un dispositif à la prise HDMI/MHL IN [j] à l’aide du câble HDMI haute
vitesse avec Ethernet [k] fourni ou un câble MHL en option [l].
Pour raccorder un ordinateur, une PlayStation ou un périphérique vidéo, utilisez le
câble HDMI haute vitesse avec Ethernet [k] fourni.
Pour raccorder un smartphone compatible MHL ou une tablette, utilisez un câble
MHL en option [l]. L’alimentation du projecteur est fournie par l’intermédiaire du
câble MHL. Le témoin
(charge) [h] s’allume (en vert).
2. Réglez la mise au point de l’image projetée [m].
3. Lisez le contenu du périphérique connecté.
Conseils
•Le projecteur possède une fonction de correction automatique de la distorsion.
L’écran est corrigé automatiquement lorsque l’image projetée est déformée
verticalement. Pendant une projection au plafond, vous ne pouvez pas exécuter la
fonction de correction automatique de la distorsion trapézoïdale.
•Vous pouvez charger le projecteur en cours d’utilisation. Notez que la capacité
restante de la batterie diminue même pendant la charge en fonction de la capacité
de l’adaptateur secteur ou du contenu projeté.
•Pour connecter des périphériques Apple, utilisez un adaptateur audio vidéo
numérique Apple (disponible dans le commerce).
•Un câble MHL [l] n’est pas fourni.
Remarques
•Lorsque la capacité restante de la batterie est faible, le témoin
(charge)
(orange) [h] clignote en permanence jusqu’à ce que le projecteur finisse par se
mettre hors tension.
•Lorsque la capacité restante de la batterie est inférieure ou égale à 10%, le symbole
(batterie faible) apparaît sur l’écran projeté.
•Le témoin (alimentation) [i] clignote en permanence (en blanc) lorsque le
projecteur surchauffe et la luminosité est réduite de moitié. Si la température
continue d’augmenter, le projecteur se met automatiquement hors tension.
Modification du mode Son et Image
Vous pouvez couper le son et sélectionner le mode Image dynamique. Le mode Image
dynamique augmente la luminosité de l’image.
1. Appuyez sur la touche (alimentation) [g] et relâchez-la rapidement (en moins
de 1 seconde) quand l’alimentation est sous tension.
Chaque fois que vous appuyez sur la touche (alimentation) [g] (et que vous la
relâchez rapidement en moins de 1 seconde), le mode Son et Image change et les
symboles correspondants s’affichent à l’écran comme suit.
• Quand le contenu du périphérique connecté n’est pas projeté (ou qu’aucun
périphérique n’est connecté à la prise HDMI/MHL IN):
(image standard, silencieux activé) (image dynamique, silencieux
désactivé) (image dynamique, silencieux activé) (image
standard, silencieux désactivé)
• Quand le contenu du périphérique connecté est projeté:
(image dynamique) (image standard)
(Le mode Son actuellement affiché (silencieux désactivé) ou (silencieux
activé) ne change pas.)
Alimentation en tension d’un autre
périphérique à partir du projecteur
1. Raccordez un périphérique à la prise USB OUT [p] à l’aide d’un câble USB en
option.
Le témoin
(charge) [n] s’allume (en vert).
Conseils
•Il est aussi possible d’alimenter un autre périphérique pendant que le projecteur est
utilisé.
•Pendant qu’un autre périphérique est alimenté en tension, vous pouvez charger
simultanément le projecteur à l’aide de la prise USB-C IN [o]. Notez que la capacité
restante de la batterie diminue même pendant la charge en fonction de la capacité
de l’adaptateur secteur ou du contenu projeté.
Remarques
•Quand un smartphone ou une tablette compatible MHL est raccordé à la prise HDMI/
MHL IN [q], le périphérique compatible MHL est alimenté en tension par
l’intermédiaire de la prise HDMI/MHL IN et l’alimentation provenant de la prise USB
OUT [p] s’arrête.
•Lorsque la capacité restante de la batterie du projecteur est faible, le témoin
(charge) [n] clignote en permanence (en orange) jusqu’à ce que le projecteur finisse
par se mettre hors tension.
•La prise USB OUT [p] ne peut être utilisée que pour alimenter un autre périphérique
en tension et non pour charger le projecteur. Pour charger le projecteur, utilisez la
prise USB-C IN [o].
•La prise USB OUT [p] sert de sortie uniquement. Ne raccordez pas la prise USB OUT à
une prise USB qui fournit de la tension, telle que la prise d’un ordinateur. Cela
pourrait provoquer un dysfonctionnement.
•Si l’appareil HDMI connecté est en veille, il se peut que le projecteur cesse
d’alimenter automatiquement l’appareil en tension après un certain temps.
Débranchez le câble USB de la prise USB OUT [p] et rebranchez-le sur l’alimentation.
Dépannage
L’alimentation ne se met pas sous tension.
q Si la capacité restante de la batterie est faible ou insuffisante, chargez la
batterie.
q Utilisez le projecteur dans un endroit où la température ambiante est comprise
entre 0°C et 35°C.
q Essayez de mettre l’alimentation hors tension, puis à nouveau sous tension.
Le projecteur ne charge pas.
q La prise USB OUT ne peut être utilisée que pour alimenter un autre périphérique
en tension et non pour charger le projecteur. Pour charger le projecteur, utilisez
la prise USB-C IN.
Le projecteur s’arrête automatiquement pendant l’utilisation.
q La capacité restante de la batterie est faible. Chargez la batterie.
q Le projecteur s’arrête automatiquement quand il surchauffe. Laissez-le refroidir
avant de l’utiliser à nouveau.
q Quand le projecteur est utilisé en étant raccordé via MHL et alimenté par
l’adaptateur secteur, la cadence de consommation électrique peut être
supérieure à celle de la charge. Selon la capacité restante de la batterie, le
projecteur peut s’arrêter. Si tel est le cas, débranchez la connexion MHL et
chargez le projecteur.
Le témoin (alimentation) (blanc) et le témoin
(charge) (rouge) clignotent
simultanément.
q Une erreur interne s’est peut-être produite. Essayez de mettre l’alimentation
hors tension, puis à nouveau sous tension.
Le témoin
(charge) clignote (en orange).
q La capacité restante de la batterie est faible. Chargez la batterie.
Aucune image n’est projetée.
q Vérifiez que le câble, le connecteur et/ou l’adaptateur sont correctement
raccordés.
q Certains formats d’image peuvent ne pas être disponibles selon le périphérique
connecté ou la méthode de connexion.
Il n’y a pas de son.
q Vérifiez le niveau de volume du périphérique connecté.
q Certains formats de son peuvent ne pas être disponibles en fonction de
l’appareil connecté ou de la méthode de connexion.
Le témoin
(charge) clignote (en rouge) pendant que le projecteur alimente
en tension un autre périphérique via la prise USB OUT.
q Le câble USB-C (fourni) n’est peut-être pas raccordé correctement. Débranchez-
le et rebranchez-le.
q Les caractéristiques du périphérique connecté ne sont peut-être pas conformes
aux exigences. Vérifiez les caractéristiques de charge du périphérique.
L’image présente une forme trapézoïdale.
q Le projecteur corrige automatiquement l’image déformée verticalement.
Cependant, si la distorsion est trop grande, cette fonction peut ne pas être
totalement efficace. De plus, la distorsion horizontale de l’image n’est pas
corrigée. Dans ce cas, déplacez le projecteur pour ajuster l’angle de projection.
L’image projetée n’est pas nette.
q Réglez la mise au point à l’aide de la commande de réglage de la mise au point.
La taille d’écran dans laquelle la mise au point peut être ajustée est comprise
entre 20pouces et 120pouces.
Le ventilateur commence à faire un bruit important.
q Arrêtez d’utiliser l’appareil et contactez votre revendeur Sony ou le centre de
service Sony agréé.
Il n’est pas possible de raccorder d’autres périphériques au projecteur.
q Tous les périphériques vidéo ne possèdent pas la connectivité HDMI ou MHL.
Pour déterminer si votre périphérique vidéo possède l’une ou l’autre
fonctionnalité, vérifiez ses caractéristiques ou contactez le fabricant.
Le projecteur ne réagit plus.
q Appuyez sur la touche d’alimentation pendant plus de 10secondes. N’effectuez
cette opération que si le projecteur se fige. Ne l’utilisez pas dans des
circonstances normales.
Spécifications
La conception et les spécifications sont susceptibles d’être modifiées sans avis.
Dimensions: environ 83.0 mm × 16.0 mm × 150.0 mm (L/H/P) (sans saillie)
Poids: environ 280 g
Température de fonctionnement: 0°C à 35°C
Résolution de sortie: 854 × 480
Sortie audio: prise audio Ф3.5
Sortie haut-parleur: 1.0W
Entrée HDMI/MHL: HDMI 1.4b/MHL 1.4 (HDCP1.4)
Taille d’image projetée: 40 po (1.02 m) à une distance de projection de 1.15 m/Max. 120 po
(3.05 m) à une distance de projection de 3.45 m
Luminosité: ANSI 105 lumens
Reproductibilité des couleurs: pleine couleur (16,770,000couleurs)
Format: 16:9
Rapport de contraste: 400:1
Durée de projection en continu: environ 120minutes (en cas de charge maximum et sans
alimentation électrique)
Durée de vie de la source lumineuse: environ 50,000heures
Entrée: CC 5 V/3.0 A
Batterie li-ion: 3.8 V, 5,000 mAh
Durée de charge: environ 2.5 heures (à partir du CP-AD3 (vendu séparément))
environ 4 heures (avec alimentation électrique 1.5 A)
Sortie: CC 5 V/1.5 A, 1 port
Remarques relatives à l’utilisation
•Avant d’utiliser le projecteur, sortez-le de son étui de transport. Pour extraire le
projecteur, tenez-le fermement.
•N’utilisez pas l’appareil s’il est humide ou endommagé. Sinon, cela peut provoquer
un choc électrique, une explosion et/ou des blessures.
•Lorsque vous utilisez un téléviseur, une radio ou un tuner, des interférences peuvent
se produire. N’installez pas le projecteur à proximité de ces produits.
•Utilisez le projecteur sur une surface plane et stable.
•N’utilisez pas le projecteur dans un endroit humide, poussiéreux ou dans le sable. De
la poussière ou du sable peut pénétrer dans les orifices de ventilation situés au bas
du projecteur et provoquer un dysfonctionnement.
•N’obstruez pas les orifices de ventilation avec les mains, etc. Cela est dangereux et
peut entraîner une surchauffe du projecteur.
•N’insérez aucun objet étranger dans les orifices de ventilation.
•N’insérez pas les ongles dans les orifices de ventilation et autres prises et ne les
suspendez pas dans les encoches pendant l’utilisation du projecteur.
•Ne court-circuitez pas le projecteur. Évitez tout contact entre des objets métalliques
tels que des pinces à cheveux et le projecteur ou ses prises.
•Ne démontez pas ou ne modifiez pas le projecteur.
•La batterie est intégrée au projecteur et ne peut pas être enlevée.
•Ne placez pas le projecteur dans un feu, un four ou un four à micro-ondes.
•Évitez de mouiller le projecteur avec de l’eau courante, de l’eau de mer, du lait, des
boissons sucrées ou de l’eau savonneuse. N’utilisez pas le projecteur s’il est mouillé.
•N’utilisez pas ou n’entreposez pas le projecteur dans un endroit où la température
est extrêmement élevée, notamment à proximité d’un feu, sous la lumière directe du
soleil, à proximité d’un appareil de chauffage ou dans un véhicule stationné en plein
soleil.
•N’utilisez pas le projecteur dans une endroit mal ventilé, notamment dans un
matelas/une couverture ou un sac.
•N’exposez pas le projecteur à un choc violent. Évitez de frapper dessus avec un
marteau, d’y poser un objet lourd, de marcher dessus ou de le laisser tomber.
•Évitez tout contact continu entre la peau et le projecteur pendant la charge ou
l’utilisation. Cela pourrait provoquer une brûlure à basse température. Faites
attention à la chaleur transmise à travers les vêtements car cela peut aussi
provoquer une brûlure à basse température.
•Avant de raccorder un périphérique portable au projecteur, installez la batterie du
périphérique. Si vous raccordez un périphérique portable quand sa batterie n’est pas
installée, vous risquez de perdre des données ou d’endommager le périphérique
portable.
•Ne touchez pas ou ne collez pas les doigts aux pièces de connexion.
•Consultez aussi le mode d’emploi du périphérique utilisé conjointement avec le
projecteur, car vous risquez de devoir l’actionner pour pouvoir l’utiliser avec le
projecteur.
•En cas de surchauffe du boîtier du projecteur dû à l’utilisation, le témoin
(charge) clignote rapidement (en orange ou en vert). Dans ce cas, arrêtez d’utiliser le
projecteur.
•Utilisez le projecteur dans un endroit qui n’est pas exposé à la poussière ou la fumée
de cigarette, car le projecteur est un appareil sensible.
•Ne placez pas le projecteur à proximité de cartes de crédit ou autres cartes. Cela
pourrait entraîner la perte de données enregistrées.
•Si l’objectif de projection n’est pas propre, essuyez-le avec un chiffon doux tel qu’un
chiffon de nettoyage pour lunette.
•N’entreposez pas le projecteur dans un endroit humide ou poussiéreux.
•Débranchez les câbles du projecteur après utilisation ou lorsque vous ne l’utilisez
pas.
•Contrôlez régulièrement les connexions du projecteur pour être certain qu’il n’y a
pas d’accumulation de poussières.
•Les enfants ne doivent utiliser le projecteur que sous la supervision d’un adulte.
Maintenez le projecteur hors de la portée des jeunes enfants.
•Il est recommandé de maintenir une distance supérieure à 1.5 fois la longueur en
diagonale de l’écran. Si vous regardez l’écran de trop près pendant longtemps, votre
vue peut s’altérer.
•EHV (valeur d’exposition au risque) ; 3.17 HD (distance de risque) ; 0.76 m
•La lumière projetée par le projecteur est classifiée dans le groupe à risque 2 (RG2)
sur base de la norme IEC62471-5:2015.
•Sony n’est pas responsable des dommages ou pertes résultant de l’utilisation du
projecteur ou de toute réclamation d’un tiers.
•Sony n’est pas responsable des problèmes d’ordinateur, téléphone cellulaire ou
autre matériel résultant de leur utilisation avec le projecteur; de la compatibilité du
produit avec un matériel, logiciel ou périphérique spécifique; des conflits de
fonctionnement avec d’autres logiciels installés; des pertes de données ou d’autres
dommages accidentels ou inévitables.
•Sony n’est pas responsable des dommages financiers, pertes de profit, réclamations
de tiers, etc., résultant de l’utilisation du projecteur.
•Si un dysfonctionnement survient, arrêtez d’utiliser l’appareil et contactez votre
revendeur Sony ou le centre de service Sony agréé.
•Il a été signalé que certains périphériques portables peuvent subir une brusque
perte de données enregistrées en mémoire, indépendamment du fait que les
données soient utilisées ou non avec le projecteur (pour plus de détails, consultez le
mode d’emploi fourni avec le périphérique portable). Avant d’utiliser le projecteur,
veillez à sauvegarder les données enregistrées en mémoire. Sony n’est pas
responsable des pertes de données.
GB (English)
Please read the following instructions carefully before using
the projector, and keep this manual for future reference.
CAUTION
• Do not stare at operating lamp. May be harmful to the eyes.
• Possibly hazardous optical radiation emitted from this product.
Check Product and Accessories Provided
• Projector (1)
• USB-C™ cable (1)
• Micro USB to USB-C adaptor (1)
• High Speed HDMI™ Cable with Ethernet (1)
• Carrying pouch (1)
• Instruction Manual (this manual, 1)
Distance and Screen Size
The illustration shows how the screen size changes depending on the distance from
the projector.
Parts and Controls
(charge) lamp (See , , , and .)
Lights up or flashes (blinks) in orange, green, or red to indicate the status of the
projector.
(power) lamp (See and .)
Lights up or blinks in white when the projector is turned on.
Speaker
Outputs the sound of a connected device. To adjust the volume, use the volume
control on the connected device.
Focus adjuster (See .)
(power) button (See .)
USB-C IN jack (See and .)
Charges the projector.
USB OUT jack (See .)
Supplies power from the projector to another device.
HDMI/MHL IN jack (See and .)
Connects to an HDMI or MHL compatible device for projecting.
AUDIO OUT jack
Connects to headphones or speakers.
Tripod socket hole
Ventilation holes
Projection lens
Charging the Projector
1. Connect the supplied USB-C cable [b] to the USB-C IN jack [d] and an optional AC
adaptor [a].
2. Connect the AC adaptor [a] to a wall outlet.
The
(charge) lamp [c] lights up (orange) while charging and the light turns
off when charging is complete (or the power is disconnected).
Tips
•When using the supplied USB-C cable [b] to charge the projector, you can charge the
projector whether it is on or off. Recharging using a USB output AC adaptor rated at 5
V 3.0 A or greater is possible. Please note that this product’s maximum input current
is 3.0 A.
•If you have a Micro USB cable and its AC adaptor (neither of them are supplied), you
can also use them to charge the projector by connecting the Micro USB cable to the
supplied Micro USB to USB-C adaptor. However, the power supply for charging the
projector is up to 1.5 A. If projecting continuously while charging the projector, the
projector may shut down due to a decrease in battery quantity.
Checking the Remaining Battery Power
1. Press and quickly release the (power) button [g] (within 1 second) when the
power is off.
The
(charge) lamp [e] flashes (orange) in one of the following patterns
according to the remaining battery power.
Lamp flash pattern Battery remaining
70% to 100%
(Flashes 3 times and after a specified time,
flashes 3 times again.)
30% to 70%
(Flashes 2 times and after a specified time,
flashes 2 times again.)
0% to 30%
(Flashes 1 time and after a specified time,
flashes 1 time again.)
Note
•When the power is on, the
(charge) lamp displays the remaining battery
power when you change the sound/picture mode (see below).
Turning the Power on
1. Press and hold the (power) button [g] for longer than one second.
The (power) lamp [f] lights up (white).
To turn off the projector, press and hold the (power) button [g] for longer than
one second.
Connecting a Device and Projecting its
Content
1. Connect a device to the HDMI/MHL IN jack [j] using the supplied High Speed
HDMI Cable with Ethernet [k] or an optional MHL cable [l].
To connect a computer, PlayStation, or video device, use the supplied High Speed
HDMI Cable with Ethernet [k].
To connect an MHL-compatible smartphone or tablet, use an optional MHL cable
[l]. The power is supplied from the projector through the MHL cable. The
(charge) lamp [h] lights up (green).
2. Adjust the focus of the projected image [m].
3. Play the connected device.
Tips
•The projector has an auto keystone correction function. The screen will be corrected
automatically when the projected image is vertically distorted. When projecting on
the ceiling, you cannot perform the auto keystone correction function.
•You can charge the projector while using it. Note that the remaining battery power
may decrease even while charging depending on the AC adaptor capability or
projecting content.
•To connect apple devices, use an Apple Digital AV adapter (commercially available).
•An MHL cable [l] is not supplied.
Notes
•When the remaining battery power is low, the
(charge) lamp (orange) [h]
keeps blinking until eventually the projector shuts down.
•When the remaining battery power is 10% or less, the
(battery low) mark
appears on the projected screen.
•The (power) lamp [i] keeps blinking (white) when the projector is overheated and
the brightness is reduced by half. If the temperature keeps rising, the projector will
shut down automatically.
Changing the Sound and Picture Mode
You can mute the sound and choose the dynamic picture mode. Dynamic picture
mode increases the brightness of the image.
1. Press and quickly release the (power) button [g] (within 1 second) when the
power is on.
Each time the (power) button [g] is pressed (and quickly released within 1
second), the sound and picture mode changes and the corresponding marks
appear on the screen as follows.
• When the content of the connected device is not projected (or no device is
connected to the HDMI/MHL IN jack):
(standard picture, muted) (dynamic picture, unmuted)
(dynamic picture, muted) (standard picture, unmuted)
Lautsprecherausgang: 1.0 W
HDMI/MHL-Eingang: HDMI 1.4b/MHL 1.4 (HDCP 1.4)
Projektionsgröße: 40 Zoll (1.02 m) bei einem Projektionsabstand von 1.15 m/max. 120 Zoll
(3.05 m) bei einem Projektionsabstand von 3.45 m
Helligkeit: 105 ANSI-Lumen
Farbwiedergabe: Vollfarben (16,770,000 Farbtöne)
Bildformat: 16:9
Kontrastverhältnis: 400:1
Kontinuierliche Projektionsdauer: ca. 120 Minuten (Akku vollständig geladen, keine
Stromversorgung anderer Geräte)
Lebensdauer der Lichtquelle: ca. 50,000 Stunden
Eingang: Gleichstrom, 5 V/3.0 A
Lithium-Ionen-Akku: 3.8 V, 5,000 mAh
Ladedauer: ca. 2.5 Stunden (über CP-AD3 (separat erhältlich))
ca. 4 Stunden (mit 1.5-A-Stromversorgung)
Ausgang: Gleichstrom, 5 V/1.5 A, 1 Anschluss
Hinweise zur Verwendung
•Nehmen Sie den Projektor vor Gebrauch aus dem Tragebeutel. Halten Sie den
Projektor dabei gut fest.
•Verwenden Sie das Gerät nicht, wenn es nass wurde oder beschädigt ist. Andernfalls
besteht Feuer- und/oder Explosionsgefahr sowie Verletzungsgefahr durch einen
elektrischen Schlag.
•Es kann zu Interferenzen mit Fernsehgeräten, Radios oder Tunern kommen. Stellen
Sie den Projektor nicht in zu großer Nähe zu solchen Geräten auf.
•Stellen Sie den Projektor auf einer stabilen und ebenen Standfläche auf.
•Verwenden Sie den Projektor nicht in feuchter, staubiger oder sandiger Umgebung.
Andernfalls können Staub oder Sand in die Lüftungsöffnungen an der Unterseite des
Projektors eindringen und Fehlfunktionen verursachen.
•Verschließen Sie die Lüftungsöffnungen nicht mit den Händen oder in anderer
Weise. Dies ist gefährlich und kann zu einer Überhitzung des Projektors führen.
•Achten Sie darauf, dass keine Fremdkörper in Lüftungsöffnungen geraten.
•Stecken Sie die Fingernägel nicht in die Lüftungsöffnungen oder in andere Buchsen
und haken Sie die Fingernägel auch nicht in die Kerben am Projektor ein, während
dieser in Gebrauch ist.
•Schließen Sie den Projektor nicht kurz. Achten Sie darauf, dass keine
Metallgegenstände wie etwa Haarklammern mit dem Projektor oder den Buchsen
daran in Berührung kommen.
•Zerlegen Sie den Projektor nicht und nehmen Sie keine Veränderungen daran vor.
•Der Akku ist fest in den Projektor eingebaut und lässt sich nicht entfernen.
•Werfen Sie den Projektor nicht ins Feuer und erhitzen Sie ihn nicht, beispielsweise in
einem Mikrowellen- oder sonstigen Herd.
•Lassen Sie den Projektor nicht nass werden. Schützen Sie ihn vor Flüssigkeiten wie
Süßwasser, Salzwasser, Milch, Limonade oder Reinigungslösungen. Verwenden Sie
den Projektor nicht, solange er nass ist.
•Verwenden oder lagern Sie den Projektor nicht an einem Ort mit sehr hohen
Temperaturen, z. B. in der Nähe von offenem Feuer oder einer Heizung, in direktem
Sonnenlicht oder in einem in der Sonne geparkten Auto.
•Achten Sie darauf, dass die Belüftung des Projektors nicht durch Decken oder
sonstige Textilien behindert wird und stecken Sie ihn bei Gebrauch nicht in eine
Tasche.
•Schützen Sie den Projektor vor Stößen und starken Erschütterungen. Schlagen Sie
nicht mit einem Hammer darauf, stellen Sie keine schweren Gegenstände darauf,
treten Sie nicht darauf und lassen Sie ihn nicht fallen.
•Vermeiden Sie anhaltenden Hautkontakt mit dem Projektor, während er aufgeladen
wird oder in Betrieb ist. Andernfalls kann es infolge einer langsamen Überhitzung
der Haut zu Verbrennungen kommen. Beachten Sie bitte, dass es auch durch die
Kleidung hindurch zu solchen Verbrennungen kommen kann.
•Bevor Sie den Projektor an ein tragbares Gerät anschließen, bringen Sie den
zugehörigen Akku am tragbaren Gerät an. Wenn Sie ein tragbares Gerät ohne Akku
anschließen, kann es zu Datenverlusten oder Schäden am tragbaren Gerät kommen.
•Berühren Sie Anschlüsse und deren Komponenten nicht und stecken Sie nicht den
Finger hinein.
•Lesen Sie auch die Bedienungsanleitung zu Geräten, die Sie in Verbindung mit dem
Projektor nutzen möchten, denn es ist möglich, dass Sie dazu Bedienschritte an
diesen Geräten ausführen müssen.
•Wenn das Projektorgehäuse im Betrieb zu heiß wird, beginnt die Ladeanzeige
(orange oder grün) schnell zu blinken. Verwenden Sie den Projektor in diesem Fall
nicht weiter.
•Schützen Sie den Projektor vor Staub und Zigarettenrauch, denn der Projektor ist
empfindlich.
•Bringen Sie den Projektor nicht in die Nähe von Kredit- oder sonstigen Karten.
Andernfalls kann es zu einem Verlust der darauf gespeicherten Daten kommen.
•Reinigen Sie das Projektionsobjektiv bei Bedarf mit einem weichen Tuch,
beispielsweise einem Brillenreinigungstuch.
•Lagern Sie den Projektor nicht in feuchter oder staubiger Umgebung.
•Lösen Sie nach Gebrauch oder bei Nichtgebrauch alle Kabel vom Projektor.
•Prüfen Sie die Anschlüsse des Projektors regelmäßig und schützen Sie sie vor
Staubablagerungen.
•Kinder dürfen den Projektor nur unter der Aufsicht Erwachsener benutzen. Halten Sie
den Projektor von kleinen Kindern fern.
•Es empfiehlt sich, einen Abstand von mehr als dem 1.5-Fachen der Diagonalen des
projizierten Bildes einzuhalten. Wenn Sie lange Zeit in geringem Abstand auf das
projizierte Bild schauen, kann sich Ihr Sehvermögen verschlechtern.
•EHV (Gefahrenwert der Exposition): 3.17 HD (Sicherheitsabstand): 0.76 m
•Das vom Projektor projizierte Licht ist gemäß IEC62471-5:2015 in Risikogruppe 2
(RG2) eingestuft.
•Sony übernimmt keine Haftung für Schäden oder Verluste, die auf die Verwendung
dieses Projektors zurückzuführen sind, und ist auch Dritten gegenüber nicht
schadenersatzpflichtig.
•Sony übernimmt keine Haftung für Probleme mit PCs, Mobiltelefonen oder anderer
Hardware, die im Zusammenhang mit dem Projektor auftreten, für die Kompatibilität
des Produkts mit bestimmter Hardware, Software oder Peripheriegeräten, für
Konflikte mit anderer installierter Software, Datenverlust und sonstige versehentliche
oder unvermeidbare Schäden.
•Sony übernimmt keine Haftung für finanzielle Schäden, entgangenen Gewinn,
Ansprüche von Dritten usw., die auf die Verwendung dieses Projektors
zurückzuführen sind.
•Im Fall einer Fehlfunktion verwenden Sie das Gerät nicht weiter und wenden Sie sich
an Ihren Sony-Händler oder einen autorisierten Kundendienst von Sony.
•Es liegen Meldungen vor, dass es bei manchen tragbaren Geräten zu plötzlichen
Verlusten gespeicherter Daten kommen kann, unabhängig davon, ob über den
Projektor auf diese Daten zugegriffen wurde oder nicht (Näheres dazu finden Sie in
der Bedienungsanleitung zum tragbaren Gerät). Erstellen Sie daher eine
Sicherungskopie solcher gespeicherter Daten, bevor Sie den Projektor benutzen.
Sony haftet nicht für Datenverluste.
Markenzeichen
•Die Begriffe HDMI und HDMI High-Definition Multimedia Interface sowie das
HDMI-Logo sind Marken oder eingetragene Marken von HDMI Licensing
Administrator, Inc. in den Vereinigten Staaten und anderen Ländern.
•MHL, Mobile High-Definition Link und das MHL Logo sind Marken oder eingetragene
Marken von MHL Licensing, LLC.
•DLP® und das DLP Logo sind eingetragene Marken von Texas Instruments.
•DLP IntelliBright™ ist eine Marke von Texas Instruments.
•USB Type-C™ und USB-C™ sind Markenzeichen von USB Implementers Forum, Inc.
•Darüber hinaus sind die in diesem Handbuch verwendeten Produktnamen im
Allgemeinen Marken oder eingetragene Marken ihrer jeweiligen Entwickler oder
Hersteller. Trotzdem werden in diesem Handbuch nicht in allen Fällen ™ oder ®
Markenzeichen verwendet.
•iPhone und iPad sind Marken von Apple, Inc.
Herstellungsjahr und -monat sind unten links auf dem Produkt aufgedruckt. Die ersten vier
Zahlen stehen für das Jahr und die letzten zwei für den Monat.
Entsorgung von gebrauchten Batterien und Akkus und gebrauchten elektrischen und
elektronischen Geräten (anzuwenden in den Ländern der Europäischen Union und anderen
Ländern mit einem separaten Sammelsystem für diese Produkte)
Das Symbol auf dem Produkt, der Batterie/dem Akku oder der Verpackung
weist darauf hin, dass das Produkt oder die Batterie/der Akku nicht als
normaler Haushaltsabfall zu behandeln sind. Ein zusätzliches chemisches
Symbol Pb (Blei) unter der durchgestrichenen Mülltonne bedeutet, dass die
Batterie/der Akku einen Anteil von mehr als 0.004% Blei enthält. Durch Ihren
Beitrag zum korrekten Entsorgen des Produktes und der Batterie/des Akkus
schützen Sie die Umwelt und die Gesundheit Ihrer Mitmenschen. Umwelt und
Gesundheit werden durch falsches Entsorgen gefährdet. Materialrecycling hilft, den Verbrauch
von Rohstoffen zu verringern. Bei Produkten, die auf Grund ihrer Sicherheit, der Funktionalität
oder als Sicherung vor Datenverlust eine ständige Verbindung zur eingebauten Batterie/zum
eingebauten Akku benötigen, sollte die Batterie/der Akku nur durch qualifiziertes
Servicepersonal ausgetauscht werden. Um sicherzustellen, dass das Produkt und die Batterie/
der Akku korrekt entsorgt werden, geben Sie das Produkt zwecks Entsorgung an einer
geeigneten Annahmestelle für das Recycling von elektrischen und elektronischen Geräten ab.
Für alle anderen Batterien/Akkus entnehmen Sie die Batterie/den Akku bitte entsprechend
dem Kapitel über die sichere Entfernung der Batterie/des Akkus. Geben Sie die Batterie/den
Akku an einer geeigneten Annahmestelle für das Recycling von Batterien/Akkus ab. Weitere
Informationen über das Recycling dieses Produkts oder der Batterie/des Akkus erhalten Sie
von Ihrer Gemeinde, den kommunalen Entsorgungsbetrieben oder dem Geschäft, in dem Sie
das Produkt gekauft haben. Hinweis für Lithiumbatterien: Bitte geben Sie nur entladene
Batterien an den Sammelstellen ab. Wegen Kurzschlussgefahr überkleben Sie bitte die Pole
der Batterie mit Klebestreifen. Sie erkennen Lithiumbatterien an den Abkürzungen Li oder CR.
Dieses Produkt wurde von oder für die Sony Corporation hergestellt.
EU Importeur: Sony Europe Limited.
Anfragen an den Importeur oder zur Produktkonformität auf Grundlage der Gesetzgebung in
Europa senden Sie bitte an den Bevollmächtigten Sony Belgium, bijkantoor van Sony Europe
Limited, Da Vincilaan 7-D1, 1935 Zaventem, Belgien.
ES (Español)
Lea detenidamente las siguientes instrucciones antes de
utilizar el proyector y conserve este manual para futuras
referencias.
PRECAUCIÓN
• No mire fijamente el foco en funcionamiento. Puede resultar dañino para los ojos.
• Este producto puede emitir radiación óptica que puede resultar dañina.
Compruebe el producto y los accesorios
proporcionados
• Proyector (1)
• Cable USB-C™ (1)
• Adaptador de Micro USB a USB-C (1)
• Cable HDMI™ de alta velocidad con Ethernet (1)
• Bolsa de transporte (1)
• Manual de instrucciones (este manual, 1)
Distancia y tamaño de la pantalla
La ilustración muestra cómo cambia el tamaño de la pantalla según la distancia a la
que se encuentre del proyector.
Componentes y controles
Indicador (carga) (Consulte , , y .)
Se ilumina o parpadea (luz intermitente) en color naranja, verde o rojo para indicar
el estado del proyector.
Indicador (alimentación) (Consulte y .)
Se ilumina o parpadea en color blanco cuando el proyector está activado.
Altavoz
Emite el sonido de un dispositivo conectado. Para ajustar el volumen, utilice el
control de volumen situado en el dispositivo conectado.
Regulador de enfoque (Consulte .)
Botón (alimentación) (Consulte .)
Toma USB-C IN (Consulte y .)
Carga el proyector.
Toma USB OUT (Consulte .)
Suministra alimentación del proyector a otro dispositivo.
Toma HDMI/MHL IN (Consulte y .)
Se conecta a un dispositivo compatible con HDMI o MHL para realizar la
proyección.
Toma AUDIO OUT
Se conecta a los auriculares o a los altavoces.
Orificio de acople del trípode
Orificios de ventilación
Lente de proyección
Carga del proyector
1. Conecte el cable USB-C suministrado [b] a la toma USB-C IN [d] y a un adaptador
de CA opcional [a].
2. Conecte el adaptador de CA [a] a una toma de pared.
El indicador
(carga) [c] se ilumina (naranja) durante la carga y la luz se
apaga cuando la carga se ha completado (o la alimentación se ha desconectado).
Consejos
•Cuando utilice el cable USB-C suministrado [b] para cargar el proyector, podrá cargar
el proyector tanto si se encuentra activado como desactivado. Se puede recargar
usando un adaptador de ca con salida USB y 5 V de potencia a 3.0 A o más. Tenga en
cuenta que la corriente de entrada máxima para este producto es de 3.0 A.
•Si cuenta con un cable Micro USB y su adaptador de CA (no se suministra ninguno de
ellos), también podrá utilizarlos para cargar el proyector conectando el cable Micro
USB al adaptador de Micro USB a USB-C suministrado. Sin embargo, el suministro de
energía para cargar el proyector es de hasta 1.5 A. Si se proyecta de forma
continuada mientras se carga el proyector, es posible que este se apague a causa de
un descenso de la cantidad de batería.
Comprobación de la energía restante de la
batería
1. Pulse y suelte rápidamente el botón (alimentación) [g] (antes de que
transcurra 1 segundo) cuando la alimentación esté desactivada.
El indicador
(carga) [e] parpadea (naranja) en uno de los siguientes
patrones de acuerdo con la energía restante de la batería.
Patrón de parpadeo del indicador Batería restante
Del 70% al 100%
(Parpadea 3 veces y después de un período
especificado, vuelve a parpadear 3 veces).
Del 30% al 70%
(Parpadea 2 veces y después de un período
especificado, vuelve a parpadear 2 veces).
Del 0% al 30%
(Parpadea 1 vez y después de un período
especificado, vuelve a parpadear 1 vez).
Nota
•Cuando la alimentación está activada, el indicador
(carga) muestra la energía
restante de la batería al cambiar el modo de sonido/imagen (consulte la información
siguiente).
Activación de la alimentación
1. Pulse y mantenga pulsado el botón (alimentación) [g] durante más de un
segundo.
El indicador (alimentación) [f] se ilumina (blanco).
Para apagar el proyector, pulse y mantenga pulsado el botón (alimentación) [g]
durante más de un segundo.
Conexión de un dispositivo y proyección de
su contenido
1. Conecte un dispositivo a la toma HDMI/MHL IN [j] utilizando el cable HDMI de
alta velocidad con Ethernet [k] suministrado o un cable MHL opcional [l].
Para conectar un ordenador, una PlayStation o un dispositivo de vídeo, utilice el
cable HDMI de alta velocidad con Ethernet [k] suministrado.
Para conectar un teléfono inteligente o una tableta compatibles con MHL, utilice
un cable MHL opcional [l]. La alimentación se suministra desde el proyector a
través del cable MHL. El indicador
(carga) [h] se ilumina (verde).
2. Ajuste el enfoque de la imagen proyectada [m].
3. Reproduzca el dispositivo conectado.
Consejos
•El proyector tiene una función de corrección trapezoidal automática. La pantalla se
corregirá de manera automática cuando la imagen proyectada se distorsione
verticalmente. Al proyectar en el techo, no puede realizar la función de corrección
trapezoidal automática.
•Podrá cargar el proyector mientras lo utilice. Tenga en cuenta que la energía restante
de la batería podría disminuir incluso durante la carga, según la capacidad del
adaptador de CA o el contenido de la proyección.
•Para conectar dispositivos Apple, utilice un adaptador de AV digital de Apple
(disponible comercialmente).
•El cable MHL [l] no se suministra.
Notas
•Cuando la energía restante de la batería sea baja, el indicador
(carga)
(naranja) [h] continuará parpadeando hasta que, al final, el proyector se apague.
•Cuando la energía restante de la batería sea del 10% o inferior, aparecerá la marca
(batería baja) en la pantalla proyectada.
•El indicador (alimentación) [i] continuará parpadeando (blanco) cuando el
proyector se haya sobrecalentado y el brillo se reducirá a la mitad. Si la temperatura
sigue subiendo, el proyector se apagará automáticamente.
Cambio de los modos de sonido e imagen
Puede silenciar el sonido y elegir el modo de imagen dinámica. El modo de imagen
dinámica aumenta el brillo de la imagen.
1. Pulse y suelte rápidamente el botón (alimentación) [g] (antes de que
transcurra 1 segundo) cuando la alimentación esté activada.
Cada vez que el botón (alimentación) [g] se pulse (y se suelte rápidamente
antes de que transcurra 1 segundo), los modos de sonido e imagen cambiarán y
las correspondientes marcas aparecerán en la pantalla tal como se indica a
continuación.
• Cuando el contenido del dispositivo conectado no se proyecte (o no haya
ningún dispositivo conectado a la toma HDMI/MHL IN):
(imagen estándar, silenciada) (imagen dinámica, no silenciada)
(imagen dinámica, silenciada) (imagen estándar, no silenciada)
• Cuando el contenido del dispositivo conectado se proyecte:
(imagen dinámica) (imagen estándar)
(El modo de sonido que aparezca en ese momento, ya sea (no silenciado) o
(silenciado), no cambiará).
Marques commerciales
•Les termes HDMI et High-Definition Multimedia Interface ainsi que le logo HDMI sont
des marques commerciales ou des marques déposées de HDMI Licensing
Administrator, Inc. aux États-Unis et dans d’autres pays.
•MHL, Mobile High-Definition Link et le logo MHL sont des marques commerciales ou
déposées de MHL Licensing, LLC.
•DLP® et le logo DLP sont des marques déposées de Texas Instruments.
•DLP IntelliBright™ est une marque commerciale de Texas Instruments.
•USB Type-C™ et USB-C™ sont des marques commerciales d’USB Implementers
Forum, Inc.
•En outre, les noms de produits ou de systèmes utilisés dans ce manuel sont, en
général, des marques commerciales ou déposées par leurs développeurs ou
fabricants respectifs. Toutefois, les symboles ™ ou ® ne sont pas systématiquement
utilisés dans ce anuel.
•iPhone et iPad sont des marques commerciales d’Apple Inc.
•“PlayStation” est une marque déposée ou une marque commerciale de Sony
Interactive Entertainment Inc.
L’année et le mois de fabrication sont imprimés au dos de ce produit à gauche. Les quatre
premiers chiffres indiquent l’année et les deux derniers indiquent le mois.
Elimination des piles et accumulateurs et des équipements électriques et électroniques
usagés (applicable dans les pays de l’Union Européenne et dans les autres pays disposant de
systèmes de collecte sélective)
Ce symbole apposé sur le produit, la pile ou l’accumulateur, ou sur
l’emballage, indique que le produit et les piles et accumulateurs fournis avec
ce produit ne doivent pas être traités comme de simples déchets ménagers.
Sur certains types de piles, ce symbole apparaît parfois combiné avec un
symbole chimique. Le symbole pour le plomb (Pb) est rajouté lorsque ces piles
contiennent plus de 0.004% de plomb. En vous assurant que les produits, piles
et accumulateurs sont mis au rebut de façon appropriée, vous participez
activement à la prévention des conséquences négatives que leur mauvais traitement pourrait
provoquer sur l’environnement et sur la santé humaine. Le recyclage des matériaux contribue
par ailleurs à la préservation des ressources naturelles. Pour les produits qui, pour des raisons
de sécurité, de performance ou d’intégrité des données, nécessitent une connexion
permanente à une pile ou à un accumulateur intégré(e), il conviendra de vous rapprocher d’un
Service Technique qualifié pour effectuer son remplacement. En rapportant votre appareil
électrique, les piles et accumulateurs en fin de vie à un point de collecte approprié vous vous
assurez que le produit, la pile ou l’accumulateur intégré sera traité correctement. Pour tous les
autres cas de figure et afin d’enlever les piles ou accumulateurs en toute sécurité de votre
appareil, reportez-vous au manuel d’utilisation. Rapportez les piles et accumulateurs, et les
équipements électriques et électroniques usagés au point de collecte approprié pour le
recyclage. Pour toute information complémentaire au sujet du recyclage de ce produit ou des
piles et accumulateurs, vous pouvez contacter votre municipalité, votre déchetterie locale ou
le point de vente où vous avez acheté ce produit.
Ce produit a été fabriqué par ou pour le compte de Sony Corporation.
Importateur dans l’UE: Sony Europe Limited.
Les questions basées sur la législation européenne pour l’importateur ou relatives à la
conformité des produits doivent être adressées au mandataire : Sony Belgium, bijkantoor van
Sony Europe Limited, Da Vincilaan 7-D1, 1935 Zaventem, Belgique.
DE (Deutsch)
Bitte lesen Sie die folgende Bedienungsanleitung vor der
Inbetriebnahme des Projektors aufmerksam durch und
bewahren Sie sie zum späteren Nachschlagen auf.
VORSICHT
• Schauen Sie nicht auf die eingeschaltete Lampe. Dies kann die Augen schädigen.
• Von diesem Produkt wird potenziell gefährliche optische Strahlung ausgegeben.
Prüfen des Geräts und des mitgelieferten
Zubehörs
• Projektor (1)
• USB-C™-Kabel (1)
• Micro-USB-zu-USB-C-Adapter (1)
• High-Speed-HDMI™-Kabel mit Ethernet (1)
• Tragebeutel (1)
• Bedienungsanleitung (diese Anleitung, 1)
Abstände und Projektionsgröße
Die Abbildung zeigt, wie sich die Projektionsgröße je nach dem Abstand vom
Projektor ändert.
Teile und Bedienelemente
Ladeanzeige (Siehe , , und .)
Leuchtet oder blinkt orange, grün oder rot und zeigt damit den Projektorstatus an.
Netzanzeige (Siehe und .)
Leuchtet oder blinkt weiß, wenn der Projektor eingeschaltet ist.
Lautsprecher
Gibt den Ton eines angeschlossenen Geräts aus. Stellen Sie die Lautstärke am
angeschlossenen Gerät ein.
Fokusregler (Siehe .)
Netztaste (Siehe .)
Buchse USB-C IN (Siehe und .)
Dient zum Laden des Projektors.
Buchse USB OUT (Siehe .)
Ermöglicht die Stromversorgung eines anderen Geräts über den Projektor.
Buchse HDMI/MHL IN (Siehe und .)
Ermöglicht den Anschluss an ein HDMI- oder MHL-kompatibles Gerät für
Projektionszwecke.
Buchse AUDIO OUT
Dient zum Anschließen von Kopfhörern oder Lautsprechern.
Stativgewindebohrung
Lüftungsöffnungen
Projektionsobjektiv
Laden des Projektors
1. Schließen Sie das mitgelieferte USB-C-Kabel [b] an die Buchse USB-C IN [d] und
ein optionales Netzteil [a] an.
2. Schließen Sie das Netzteil [a] an eine Netzsteckdose an.
Die Ladeanzeige
[c] (orange) leuchtet beim Laden und erlischt, wenn der
Ladevorgang abgeschlossen ist (oder das Gerät von der Stromquelle getrennt
wird).
Tipps
•Über das mitgelieferte USB-C-Kabel [b] kann der Projektor in ein- oder
ausgeschaltetem Zustand geladen werden. Das Aufladen über ein Netzteil mit
USB-Ausgang ausgelegt für 5 V, 3.0 A oder höher ist möglich. Bitte beachten Sie,
dass der maximale Eingangsstrom dieses Produkts 3.0 A beträgt.
•Mit einem Micro-USB-Kabel und dem dazugehörigen Netzteil (beide nicht
mitgeliefert) kann der Projektor ebenfalls aufgeladen werden, indem man das
Micro-USB-Kabel einfach an den mitgelieferten Micro-USB-zu-USB-C-Adapter
anschließt. Allerdings beträgt die Stromstärke zum Laden des Projektors maximal 1.5
A. Wenn beim Laden des Projektors ständig projiziert wird, schaltet sich der Projektor
aufgrund schwacher Akkuladung möglicherweise aus.
Überprüfen der Akkurestladung
1. Drücken Sie bei ausgeschaltetem Gerät die Netztaste [g] und lassen Sie sie
schnell wieder los (innerhalb einer 1 Sekunde).
Die Ladeanzeige
[e] (orange) blinkt je nach Akkurestladung in einem der
folgenden Muster.
Blinkmuster der Anzeige Akkurestladung
70% bis 100%
(Blinkt 3-mal und dann nach einer bestimmten
Zeit noch 3-mal.)
30% bis 70%
(Blinkt 2-mal und dann nach einer bestimmten
Zeit noch 2-mal.)
0% bis 30%
(Blinkt 1-mal und dann nach einer bestimmten
Zeit noch 1-mal.)
Hinweis
•Ist das Gerät eingeschaltet, zeigt die Ladeanzeige
beim Umschalten des Ton-/
Bildmodus (siehe unten) die Akkurestladung an.
Einschalten
1. Halten Sie die Netztaste [g] länger als eine Sekunde gedrückt.
Die Netzanzeige [f] leuchtet (weiß).
Zum Ausschalten des Projektors halten Sie die Netztaste [g] länger als eine
Sekunde gedrückt.
Anschließen eines Geräts und Projizieren
darauf gespeicherter Inhalte
1. Schließen Sie ein Gerät über das mitgelieferte High-Speed-HDMI-Kabel mit
Ethernet [k] oder über ein optionales MHL-Kabel [l] an die Buchse HDMI/MHL IN
[j] an.
Zum Anschließen eines Computers, einer PlayStation oder eines Videogeräts
verwenden Sie bitte das mitgelieferte High-Speed-HDMI-Kabel mit Ethernet [k].
Zum Anschließen eines MHL-kompatiblen Smartphones oder Tablets verwenden
Sie bitte ein optionales MHL-Kabel [l]. Das angeschlossene Gerät wird dann über
das MHL-Kabel vom Projektor mit Strom versorgt. Die Ladeanzeige
[h]
(grün) leuchtet.
2. Stellen Sie das projizierte Bild mit dem Fokusregler [m] ein.
3. Starten Sie die Wiedergabe am angeschlossenen Gerät.
Tipps
•Der Projektor hat eine Korrekturautomatik für die Trapezverzeichnung. Ist das
projizierte Bild vertikal verzerrt, wird es automatisch korrigiert. Beim Projizieren an
der Decke kann die Korrekturautomatik für die Trapezverzeichnung nicht ausgeführt
werden.
•Der Projektor kann geladen werden, während er in Gebrauch ist. Beachten Sie bitte,
dass die Akkurestladung je nach Netzteilkapazität oder projizierten Inhalten während
des Ladens abnehmen kann.
•Apple-Geräte können Sie über einen (handelsüblichen) Apple Digital AV Adapter
anschließen.
•Es wird kein MHL-Kabel [l] mitgeliefert.
Hinweise
•Bei geringer Akkurestladung blinkt die Ladeanzeige
[h] (orange) dauerhaft,
bis sich der Projektor ausschaltet.
•Bei einer Akkurestladung von 10% oder weniger wird das Symbol
(Akku fast
leer) ins projizierte Bild eingeblendet.
•Ist der Projektor überhitzt, blinkt die Netzanzeige [i] dauerhaft (weiß) und die
Helligkeit wird auf die Hälfte reduziert. Steigt die Temperatur trotzdem weiter an,
schaltet sich der Projektor automatisch aus.
Umschalten des Ton- und Bildmodus
Sie können den Ton stummschalten und den dynamischen Bildmodus auswählen. Im
dynamischen Bildmodus wird die Bildhelligkeit verstärkt.
1. Drücken Sie bei eingeschaltetem Gerät die Netztaste [g] und lassen Sie sie
schnell wieder los (innerhalb einer 1 Sekunde).
Jedes Mal, wenn die Netztaste [g] gedrückt (und innerhalb einer 1 Sekunde
schnell wieder losgelassen wird), wechseln Ton- und Bildmodus und in das
projizierte Bild werden die entsprechenden Symbole eingeblendet.
• Wenn über das angeschlossene Gerät nichts projiziert wird (oder wenn kein
Gerät an die Buchse HDMI/MHL IN angeschlossen ist):
(Standardbild, stummgeschaltet) (dynamisches Bild, nicht
stummgeschaltet) (dynamisches Bild, stummgeschaltet)
(Standardbild, nicht stummgeschaltet)
• Wenn über das angeschlossene Gerät etwas projiziert wird:
(dynamisches Bild) (Standardbild)
(Der gerade angezeigte Tonmodus (nicht stummgeschaltet) oder
(stummgeschaltet) ändert sich dabei nicht.)
Stromversorgung eines anderen Geräts über
den Projektor
1. Schließen Sie das gewünschte Gerät mithilfe eines optionalen USB-Kabels an
die Buchse USB OUT [p] an.
Die Ladeanzeige
[n] (grün) leuchtet.
Tipps
•Ein anderes Gerät kann sogar dann über den Projektor mit Strom versorgt werden,
wenn dieser in Betrieb ist.
•Wenn ein anderes Gerät über den Projektor mit Strom versorgt wird, kann der
Projektor gleichzeitig über die Buchse USB-C IN [o] aufgeladen werden. Beachten Sie
bitte, dass die Akkurestladung je nach Netzteilkapazität oder projizierten Inhalten
während des Ladens abnehmen kann.
Hinweise
•Wird ein MHL-kompatibles Smartphone oder Tablet an die Buchse HDMI/MHL IN [q]
angeschlossen, dann wird das angeschlossene MHL-kompatible Gerät über die
Buchse HDMI/MHL IN mit Strom versorgt und die Stromversorgung über die Buchse
USB OUT [p] stoppt.
•Bei geringer Akkurestladung im Projektor blinkt die Ladeanzeige
[n] (orange)
dauerhaft, bis sich der Projektor ausschaltet.
•Die Buchse USB OUT [p] kann ausschließlich zur Stromversorgung anderer Geräte,
nicht jedoch zum Laden des Projektors verwendet werden. Der Projektor kann nur
über die Buchse USB-C IN [o] geladen werden.
•Die Buchse USB OUT [p] ist eine reine Ausgangsbuchse. Schließen Sie die Buchse
USB OUT nicht an eine USB-Buchse an, über die Strom ausgegeben wird,
beispielsweise an einem Computer. Andernfalls kann es zu einer Fehlfunktion
kommen.
•Wenn sich das angeschlossene HDMI-Gerät im Energiesparmodus befindet, beendet
der Projektor die Stromversorgung des Geräts nach einer bestimmten Zeit
möglicherweise automatisch. Trennen Sie das USB-Kabel von der Buchse USB OUT
[p] und schließen Sie es zur erneuten Stromversorgung wieder an.
Störungsbehebung
Das Gerät schaltet sich nicht ein.
q Ist die Akkurestladung niedrig oder nicht ausreichend, laden Sie den Akku auf.
q Verwenden Sie den Projektor ausschließlich bei Umgebungstemperaturen
zwischen 0 °C und 35 °C.
q Schalten Sie das Gerät aus und wieder ein.
Der Akku im Projektor wird nicht aufgeladen.
q Die Buchse USB OUT kann ausschließlich zur Stromversorgung anderer Geräte,
nicht jedoch zum Laden des Projektors verwendet werden. Der Projektor kann
nur über die Buchse USB-C IN geladen werden.
Der Projektor schaltet sich im Betrieb automatisch aus.
q Der Akku ist fast leer. Laden Sie den Akku.
q Der Projektor schaltet sich bei Überhitzung automatisch aus. Lassen Sie ihn
abkühlen, bevor Sie ihn wieder in Betrieb nehmen.
q Wenn der Projektor in Betrieb und über MHL angeschlossen ist und per Netzteil
mit Strom versorgt wird, verbraucht er unter Umständen mehr Strom, als
geladen werden kann. Je nach Akkurestladung schaltet sich der Projektor in
einer solchen Situation eventuell aus. Trennen Sie in diesem Fall die MHL-
Verbindung und laden Sie den Projektor.
Die Netzanzeige (weiß) und die Ladeanzeige
(rot) blinken gleichzeitig.
q Möglicherweise ist im Gerät ein Fehler aufgetreten. Schalten Sie das Gerät aus
und wieder ein.
Die Ladeanzeige
(orange) blinkt.
q Der Akku ist fast leer. Laden Sie den Akku.
Es werden keine Bilder projiziert.
q Prüfen Sie, ob Kabel, Stecker und/oder Adapter ordnungsgemäß angeschlossen
sind.
q Je nach angeschlossenem Gerät oder Anschlussmethode stehen bestimmte
Bildformate eventuell nicht zur Verfügung.
Es ist kein Ton zu hören.
q Prüfen Sie die Lautstärke am angeschlossenen Gerät.
q Manche Klangformate sind je nach angeschlossenem Gerät oder
Verbindungsmethode möglicherweise nicht verfügbar.
Die Ladeanzeige
(rot) blinkt, während der Projektor ein anderes Gerät über
die Buchse USB OUT mit Strom versorgt.
q Möglicherweise ist das USB-C-Kabel (mitgeliefert) nicht ordnungsgemäß
angeschlossen. Lösen Sie es und schließen sie es neu an.
q Möglicherweise entsprechen die Spezifikationen des angeschlossenen Geräts
nicht den Anforderungen. Prüfen Sie die Ladespezifikation des Geräts.
Das Bild wird trapezförmig verzerrt angezeigt.
q Der Projektor korrigiert ein vertikal verzerrtes Bild automatisch. Bei einer zu
starken Verzerrung reicht diese Korrektur unter Umständen jedoch nicht aus. Ein
horizontal verzerrtes Bild wird überhaupt nicht korrigiert. Verschieben Sie in
einem solchen Fall den Projektor, um den Projektionswinkel zu korrigieren.
Das projizierte Bild ist unscharf.
q Stellen Sie den Fokus mit dem Fokusregler ein. Der Fokus lässt sich auf
Projektionsgrößen von 20 Zoll bis 120 Zoll einstellen.
Der Lüfter erzeugt laute Geräusche.
q Verwenden Sie das Gerät nicht weiter und wenden Sie sich an den Sony-
Händler oder einen autorisierten Kundendienst von Sony.
Andere Geräte lassen sich nicht an den Projektor anschließen.
q Nicht alle Videogeräte verfügen über HDMI- oder MHL-Anschlüsse. Bitte lesen
Sie in den technischen Daten zu Ihrem Videogerät nach, welche
Anschlussmöglichkeiten es bietet, oder wenden Sie sich an den Hersteller.
Der Projektor reagiert nicht mehr.
q Drücken Sie die Netztaste mehr als 10 Sekunden lang. Tun Sie dies bitte nur,
wenn der Projektor überhaupt nicht mehr reagiert. Unter normalen Umständen
sollten Sie diese Funktion auf keinen Fall ausführen.
Technische Daten
Änderungen, die dem technischen Fortschritt dienen, bleiben vorbehalten.
Abmessungen: ca. 83.0 mm × 16.0 mm × 150.0 mm (B/H/L) (ohne vorstehende Teile)
Gewicht: ca. 280 g
Betriebstemperatur: 0 °C bis 35 °C
Ausgabeauflösung: 854 × 480
Audioausgang: Audiobuchse, Ф 3.5 mm
Suministro de alimentación del proyector a
otro dispositivo
1. Conecte un dispositivo a la toma USB OUT [p] utilizando un cable USB opcional.
El indicador
(carga) [n] se ilumina (verde).
Consejos
•Es posible suministrar alimentación a otro dispositivo incluso mientras se esté
utilizando el proyector.
•Durante el suministro de alimentación a otro dispositivo, podrá cargar el proyector a
través de la toma USB-C IN [o] simultáneamente. Tenga en cuenta que la energía
restante de la batería podría disminuir incluso durante la carga, según la capacidad
del adaptador de CA o el contenido de la proyección.
Notas
•Cuando un teléfono inteligente o una tableta compatibles con MHL se conecten a la
toma HDMI/MHL IN [q], se suministrará alimentación al dispositivo compatible con
MHL que esté conectado a través de la toma HDMI/MHL IN y el suministro de
alimentación procedente de la toma USB OUT [p] se detendrá.
•Cuando la energía restante de la batería del proyector sea baja, el indicador
(carga) [n] continuará parpadeando (naranja) hasta que, al final, el proyector se
apague.
•La toma USB OUT [p] solamente se puede utilizar para suministrar alimentación a
otro dispositivo y no se puede utilizar para cargar el proyector. Para cargar el
proyector, utilice la toma USB-C IN [o].
•La toma USB OUT [p] solamente está diseñada para emitir. No conecte la toma USB
OUT a una toma USB que emita alimentación; por ejemplo, a una del ordenador. De
lo contrario, podría causar un fallo de funcionamiento.
•Si el dispositivo de HDMI conectado está en espera, es posible que el proyector deje
de suministrarle energía automáticamente una vez transcurrido un periodo de
tiempo determinado. Desconecte el cable USB de la toma USB OUT [p] y vuelva a
conectarlo al suministro de alimentación.
Resolución de problemas
El proyector no se enciende.
q Si la energía restante de la batería es baja o insuficiente, cargue la batería.
q Utilice el proyector en una ubicación con una temperatura ambiente situada
entre 0°C y 35°C.
q Pruebe a desactivar y activar la alimentación varias veces seguidas.
El proyector no se carga.
q La toma USB OUT solamente se puede utilizar para suministrar alimentación a
otro dispositivo y no se puede utilizar para cargar el proyector. Para cargar el
proyector, utilice la toma USB-C IN.
El proyector se apaga automáticamente durante su uso.
q La energía restante de la batería es baja. Cargue la batería.
q El proyector se apaga automáticamente cuando se sobrecalienta. Deje que se
enfríe antes de volver a utilizarlo.
q Cuando el proyector esté en uso, conectado mediante MHL y alimentado por el
adaptador de CA, es posible que el índice de consumo energético sea mayor
que el índice de carga. Según la energía restante de la batería, el proyector
podría apagarse. Si esto ocurriera, desconecte la conexión MHL y cargue el
proyector.
Los indicadores (alimentación) (blanco) y
(carga) (rojo) parpadean al
mismo tiempo.
q Es posible que se haya producido un error interno. Pruebe a desactivar y activar
la alimentación varias veces seguidas.
El indicador
(carga) está parpadeando (naranja).
q La energía restante de la batería es baja. Cargue la batería.
No se proyecta ninguna imagen.
q Compruebe que el cable, el conector y/o el adaptador estén conectados
correctamente.
q Es posible que algunos formatos de imagen no estén disponibles, según el
dispositivo conectado o el método de conexión.
No se emite sonido.
q Compruebe el nivel de volumen del dispositivo conectado.
q Es posible que algunos formatos de sonido no estén disponibles en función del
dispositivo conectado o del método de conexión.
El indicador
(carga) parpadea (rojo) mientras el proyector suministra
alimentación a otro dispositivo a través de la toma USB OUT.
q Es posible que el cable USB-C (suministrado) no esté conectado correctamente.
Desconéctelo y vuelva a conectarlo.
q Es posible que las especificaciones del dispositivo conectado no cumplan todos
los requisitos. Compruebe las especificaciones de carga del dispositivo.
La imagen es una forma trapezoidal.
q El proyector corrige de manera automática la imagen distorsionada
verticalmente. Sin embargo, si la distorsión es demasiado grande, es posible
que esta función no sea lo suficientemente efectiva. Además, la imagen
distorsionada horizontalmente no se corregirá. En tales casos, mueva el
proyector para ajustar el ángulo de proyección.
La imagen proyectada no es nítida.
q Ajuste el enfoque utilizando el ajustador de enfoque. El tamaño de pantalla
cuyo enfoque se puede ajustar comprende de 20 pulgadas a 120 pulgadas.
El ventilador ha empezado a hacer un ruido fuerte.
q Deje de utilizarlo y póngase en contacto con el distribuidor de Sony o con un
centro de servicios autorizado por Sony.
Los demás dispositivos no se pueden conectar al proyector.
q No todos los dispositivos de vídeo dispondrán de conectividad HDMI o MHL.
Para saber si su dispositivo de vídeo tiene alguna de estas capacidades,
compruebe sus especificaciones o póngase en contacto con el fabricante.
El proyector deja de responder.
q Pulse el botón de alimentación durante más de 10 segundos. Realice esta
operación solamente cuando el proyector se detenga por completo. No utilice
esta operación en circunstancias normales.
Especificaciones
El diseño y las especificaciones están sujetos a cambios sin previo aviso.
Dimensiones: aprox. 83.0 mm × 16.0 mm × 150.0 mm (An./Al./L.) (sin partes salientes)
Peso: aprox. 280 g
Temperatura de funcionamiento: de 0 °C a 35 °C
Resolución de salida: 854 × 480
Salida de audio: toma de audio de Ф3.5
Salida de altavoz: 1.0 W
Entrada HDMI/MHL: HDMI 1.4b/MHL 1.4 (HDCP1.4)
Tamaño de imagen proyectada: 40 pulgadas (1.02 m) a una distancia de proyección de 1.15
m/Un máximo de 120 pulgadas (3.05 m) a una distancia de proyección de 3.45 m
Brillo: 105 lúmenes ANSI
Capacidad de reproducción de colores: a todo color (16,770,000 colores)
Relación de aspecto: 16:9
Relación de contraste: 400:1
Tiempo de proyección continua: aprox. 120 minutos (cuando está totalmente cargado y sin
suministro de alimentación)
Vida útil de la fuente de luz: aprox. 50,000 horas
Entrada: CC de 5 V/3.0 A
Batería de iones de litio: 3.8 V, 5,000 mAh
Tiempo de carga: aprox. 2.5 horas (de CP-AD3 (se vende por separado))
aprox. 4 horas (con un suministro de alimentación de 1.5A)
Salida: CC de 5 V/1.5 A, 1 puerto
Notas acerca del uso
•Antes de utilizarlo, saque el proyector de la bolsa de transporte. Cuando lo saque,
sujete el proyector firmemente.
•No haga funcionar la unidad si se ha mojado o dañado. De lo contrario, podría
causar una descarga eléctrica, una explosión y/o lesiones.
•Cuando utilice un televisor, una radio o un sintonizador, es posible que se produzcan
interferencias. No instale el proyector demasiado cerca de los productos antes
mencionados.
•Utilice el proyector sobre una superficie estable y plana.
•No utilice el proyector en condiciones que impliquen la existencia de humedad,
polvo o arena. El polvo o la arena podrían introducirse a través de los orificios de
ventilación situados en la parte inferior del proyector y causar un fallo de
funcionamiento.
•No bloquee los orificios de ventilación con las manos, etc. Esto es peligroso y podría
provocar que el proyector se sobrecalentara.
•No coloque ningún objeto extraño en los orificios de ventilación.
•No inserte las uñas en los orificios de ventilación o en otras tomas, ni enganche las
uñas en los huecos de separación mientras utilice el proyector.
•No provoque un cortocircuito en el proyector. No permita que los objetos de metal,
como las horquillas, entren en contacto con el proyector o sus tomas.
•No desmonte ni modifique el proyector.
•La batería está incorporada en el proyector y no se puede extraer.
•No coloque el proyector en el fuego, ni lo caliente en un microondas o en un horno
convencional.
•No permita que el proyector se moje con agua dulce, agua de mar, leche, bebidas
carbonatadas o agua jabonosa. No utilice el proyector mientras esté mojado.
•No utilice ni almacene el proyector en un lugar donde la temperatura sea
extremadamente alta, como cerca de un fuego, bajo la luz solar directa, cerca de un
calefactor o dentro de un coche aparcado a pleno sol.
•No utilice el proyector en un lugar que tenga una mala ventilación, como cuando
esté envuelto en una colcha/manta o cuando se encuentre dentro de una bolsa.
•No exponga el proyector a impactos fuertes. Evite golpearlo con un martillo,
colocarle cualquier objeto pesado encima, pisarlo o dejarlo caer.
•Evite mantener un contacto continuo entre su piel y el proyector mientras lo esté
cargando o durante su uso. De lo contrario, podría causarse lesiones por
quemaduras de baja temperatura. Tenga cuidado con el calor transmitido a través de
la ropa, ya que también podría causarle lesiones por quemaduras de baja
temperatura.
•Antes de conectar un dispositivo portátil al proyector, acople la batería del
dispositivo portátil. La conexión de un dispositivo portátil mientras se extrae la
batería podría causar pérdida de datos o daños al dispositivo portátil.
•No toque ni meta el dedo en las piezas de conexión.
•Consulte también el manual del dispositivo que esté utilizando junto con el
proyector, puesto que es posible que necesite realizar operaciones en el dispositivo
para usarlo con el proyector.
•Cuando el cuerpo del proyector se sobrecaliente a causa del uso, el indicador
(carga) parpadeará rápidamente (naranja o verde). En este caso, deje de utilizar el
proyector.
•Utilice el proyector en un lugar en el que no haya polvo ni humo de tabaco, ya que el
proyector es un dispositivo muy sensible.
•No coloque el proyector cerca de tarjetas de crédito ni de ningún otro tipo de
tarjetas magnéticas. De lo contrario, podría causar la pérdida de los datos grabados.
•Si la lente de proyección no está limpia, enjuáguela con un paño suave, como una
toallita de limpieza para gafas.
•No almacene el proyector en un lugar húmedo o polvoriento.
•Retire los cables del proyector después de utilizarlo o cuando no esté en uso.
•Compruebe las conexiones del proyector periódicamente para asegurarse de que el
polvo no se acumule.
•Los niños solo deberían utilizar el proyector bajo la supervisión de un adulto.
Mantenga el proyector fuera del alcance de los niños pequeños.
•Se recomienda que mantenga una distancia de más de entre 1.5 veces la longitud en
diagonal de la pantalla. Si mira la pantalla a una distancia cercana durante un tiempo
prolongado, es posible que su vista empeore.
•EHV (valor de exposición a riesgos): 3.17 HD (distancia de riesgo): 0.76 m
•La luz proyectada del proyector se clasifica como grupo de riesgo 2 (RG2, Risk Group
2) según IEC62471-5:2015.
•Sony no se hace responsable de los daños o las pérdidas que se deriven del uso del
proyector, ni de ninguna reclamación de terceros.
•Sony no se hace responsable del mal funcionamiento del PC o del teléfono móvil ni
de otros problemas de hardware causados por el uso de los dispositivos con el
proyector; ni de la compatibilidad del producto con un hardware, un software o unos
periféricos específicos; ni de los conflictos operativos con otro software instalado; ni
de la pérdida de datos; ni de otros daños accidentales o inevitables.
•Sony no se hace responsable de los daños financieros, la pérdida de beneficios, las
reclamaciones de terceros, etc. que se deriven del uso del proyector.
•Si se produce un fallo de funcionamiento, deje de utilizarlo y póngase en contacto
con el distribuidor de Sony o con un centro de servicios autorizado por Sony.
•Se nos ha informado de que algunos dispositivos portátiles podrían incurrir en una
repentina pérdida de los datos que se guardan en la memoria, independientemente
de si los datos se utilizan o no con el proyector (para obtener más información,
consulte el manual del usuario que se suministra con el dispositivo portátil). Antes
de utilizar el proyector, asegúrese de realizar una copia de seguridad de los datos
que se guardan en la memoria. Sony no se hace responsable de la pérdida de datos.
Marcas comerciales
•Los términos HDMI y HDMI High-Definition Multimedia Interface, y el Logotipo HDMI
son marcas comerciales o marcas registradas de HDMI Licensing Administrator, Inc.
en los Estados Unidos y en otros países.
•MHL, Enlace de alta definición móvil y el logo MHL son marcas comerciales o marcas
comerciales registradas de MHL Licensing, LLC.
•DLP® y el logotipo de DLP son marcas comerciales registradas de Texas Instruments.
•DLP IntelliBright™ es una marca comercial de Texas Instruments.
•USB Type-C™ y USB-C™ son marcas comerciales de USB Implementers Forum, Inc.
•Además, los nombres de productos y sistemas que se mencionan en este manual
son, en general, marcas comerciales o marcas comerciales registradas de sus
respectivos desarrolladores o fabricantes. Sin embargo, las marcas ™ o ® no se
utilizan en todos los casos en este manual.
•iPhone y iPad son marcas comerciales de Apple Inc.
El año y el mes de fabricación están impresos en la parte inferior de este producto a la
izquierda. Los primeros cuatro dígitos indican el año y los dos últimos indican el mes.
Tratamiento de las baterías y equipos eléctricos y electrónicos al final de su vida útil (aplicable
en la Unión Europea y otros países con sistemas de tratamiento selectivo de residuos)
Este símbolo en el producto, la batería o el embalaje indica que el producto y
la batería no pueden tratarse como un residuo doméstico normal. En algunas
baterías este símbolo puede utilizarse en combinación con un símbolo
químico. Se añadirá el símbolo químico del plomo (Pb) si la batería contiene
más del 0.004% de plomo. Al asegurarse de que estos productos y baterías se
desechan correctamente, ayudará a prevenir las posibles consecuencias
negativas para la salud y el medio ambiente que podrían derivarse de su
incorrecta manipulación. El reciclaje de los materiales ayuda a preservar los recursos naturales.
En el caso de productos, que por razones de seguridad, rendimiento o mantenimiento de
datos, requieran una conexión permanente con la batería incorporada, esta batería deberá
reemplazarse únicamente por personal técnico cualificado para ello. Para asegurarse de que
la batería se desecha correctamente, entregue estos productos al final de su vida útil en un
punto de recogida adecuado para el reciclado de aparatos eléctricos y electrónicos. Para el
resto de baterías, consulte la sección donde se indica cómo extraer la batería del producto de
forma segura. Deposite la batería en el correspondiente punto de recogida para el reciclado
de baterías. Si desea obtener información detallada sobre el reciclaje de este producto o de la
batería, póngase en contacto con el ayuntamiento, el punto de recogida más cercano o el
establecimiento donde ha adquirido el producto o la batería.
Este producto ha sido fabricado por, o en nombre de Sony Corporation.
Importador UE: Sony Europe Limited.
Las consultas relacionadas con el Importador a la UE o con la conformidad del producto en
Europa deben dirigirse al representante autorizado por el fabricante, Sony Belgium, bijkantoor
van Sony Europe Limited, Da Vincilaan 7-D1, 1935 Zaventem, Bélgica.
NL (Nederlands)
Lees deze instructies zorgvuldig door voor u de projector
gebruikt en houd deze handleiding bij als referentie.
OPGELET
• Staar niet in het bedieningslampje. Dit kan schadelijk zijn voor de ogen.
• Dit product genereert mogelijk gevaarlijke optische straling.
Het product en de bijgeleverde accessoires
controleren
• Projector (1)
• USB-C™-kabel (1)
• Micro-USB-naar-USB-C-adapter (1)
• High Speed HDMI™-kabel met Ethernet (1)
• Draaghoes (1)
• Gebruiksaanwijzing (deze handleiding, 1)
Afstand en schermformaat
Raadpleeg de afbeelding voor meer informatie over hoe het schermformaat
afhankelijk is van de afstand tot de projector.
Onderdelen en bedieningselementen
(opladen)-lampje (zie , , en )
Brandt of knippert oranje, groen of rood om de status van de projector aan te
geven.
(voeding)-lampje (zie en )
Brandt of knippert wit wanneer de projector ingeschakeld is.
Luidspreker
Voert het geluid van een aangesloten apparaat uit. Gebruik de volumeknop van
het aangesloten apparaat om het volume te regelen.
Scherpstellingsregelaar (zie )
(voeding)-knop (zie )
USB-C IN-aansluiting (zie en )
Voor het opladen van de projector.
USB OUT-aansluiting (zie )
Hiermee kunt u met de projector een ander apparaat van voeding voorzien.
HDMI/MHL IN-aansluiting (zie en )
Voor het aansluiten van een met HDMI of MHL compatibel apparaat voor
projecteren.
AUDIO OUT-aansluiting
Voor het aansluiten van een hoofdtelefoon of luidspreker.
Bevestigingsopening voor statief
Ventilatieopeningen
Projectielens
De projector opladen
1. Sluit de bijgeleverde USB-C-kabel [b] aan op de USB-C IN-aansluiting [d] en een
optionele netspanningsadapter [a].
2. Sluit de netspanningsadapter [a] aan op een stopcontact.
Het
(opladen)-lampje [c] brandt (oranje) tijdens het opladen en dooft
wanneer het opladen voltooid is (of wanneer de voeding verbroken wordt).
Tips
•Wanneer u de bijgeleverde USB-C-kabel [b] gebruikt om de projector op te laden,
kunt u deze laatste zowel in- als uitgeschakeld opladen. Opladen met een
netspanningsadapter met USB-uitvoer 5 V 3.0 A of meer is mogelijk. Houd er
rekening mee dat de maximale invoerstroom 3.0 A is.
•Als u over een Micro-USB-kabel en een bijbehorende netspanningsadapter beschikt
(deze zijn niet bijgeleverd), kunt u deze ook gebruiken om de projector op te laden.


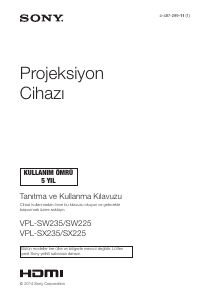

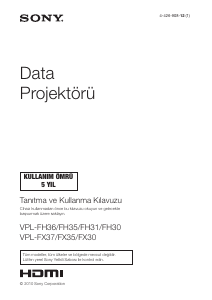


Bu ürün hakkındaki sohbete katıl
Burada Sony MP-CD1 Projektör hakkında ne düşündüğünüzü paylaşabilirsiniz. Bir sorunuz varsa öncelikle kılavuzu dikkatlice okuyun. Kılavuz talebinde bulunmak için iletişim formumuzu kullanabilirsiniz.