DE Bedienungsanleitung
EN Instruction Manual
FR Mode D’emploi
SAFETY
IMPORTANT INSTRUCTIONS ON SAFETY OF USE PLEASE READ CAREFULLY
AND KEEP FOR FUTURE REFERENCE!
• By ignoring the safety instructions the manufacturer can not be hold
responsible for the damage.
• If the supply cord is damaged, it must be replaced by the manufacturer,
its service agent or similarly qualied persons in order to avoid a hazard.
• Never move the appliance by pulling the cord and make sure the cord
can not become entangled.
• The appliance must be placed on a stable, level surface.
• The user must not leave the device unattended while it is connected
to the supply.
• This appliance is only to be used for household purposes and only for
the purpose it is made for.
• To protect yourself against an electric shock, do not immerse the cord,
plug or appliance in the water or any other liquid.
• The appliance should only be connected to an earthed socket. Make
sure the voltage indicated on the appliance corresponds to the local
mains voltage before plugging in.
CHILD SAFETY: This appliance should not be used by children under 8
years of age. This appliance can only be used by children aged from 8
years and above and persons with reduced physical, sensory or mental
capabilities or lack of experience and knowledge if they are supervised
or understand the hazards and instructions concerning use of the
appliance in a safe way. Children should not play with the device. Keep
the device and cord out of the reach of children under 8 years old.
Cleaning and maintenance should not be done by children unless they
are over 8 years old and under supervision.
DEVICE SAFETY:
Caution: Do not place this device near a heater. Do not use it
near ammable gas or liquids.
Do not use the socket if it is loose or damaged. Do not modify the length
of the power cord length or share the outlet with other devices. Never
try to take apart or repair the dehumidier by yourself. Do not place
a heavy object on the power cord and make sure that the cord is not
compressed. Do not place ower vases or other water containers on top
of the device. Do not climb on or sit on the device.
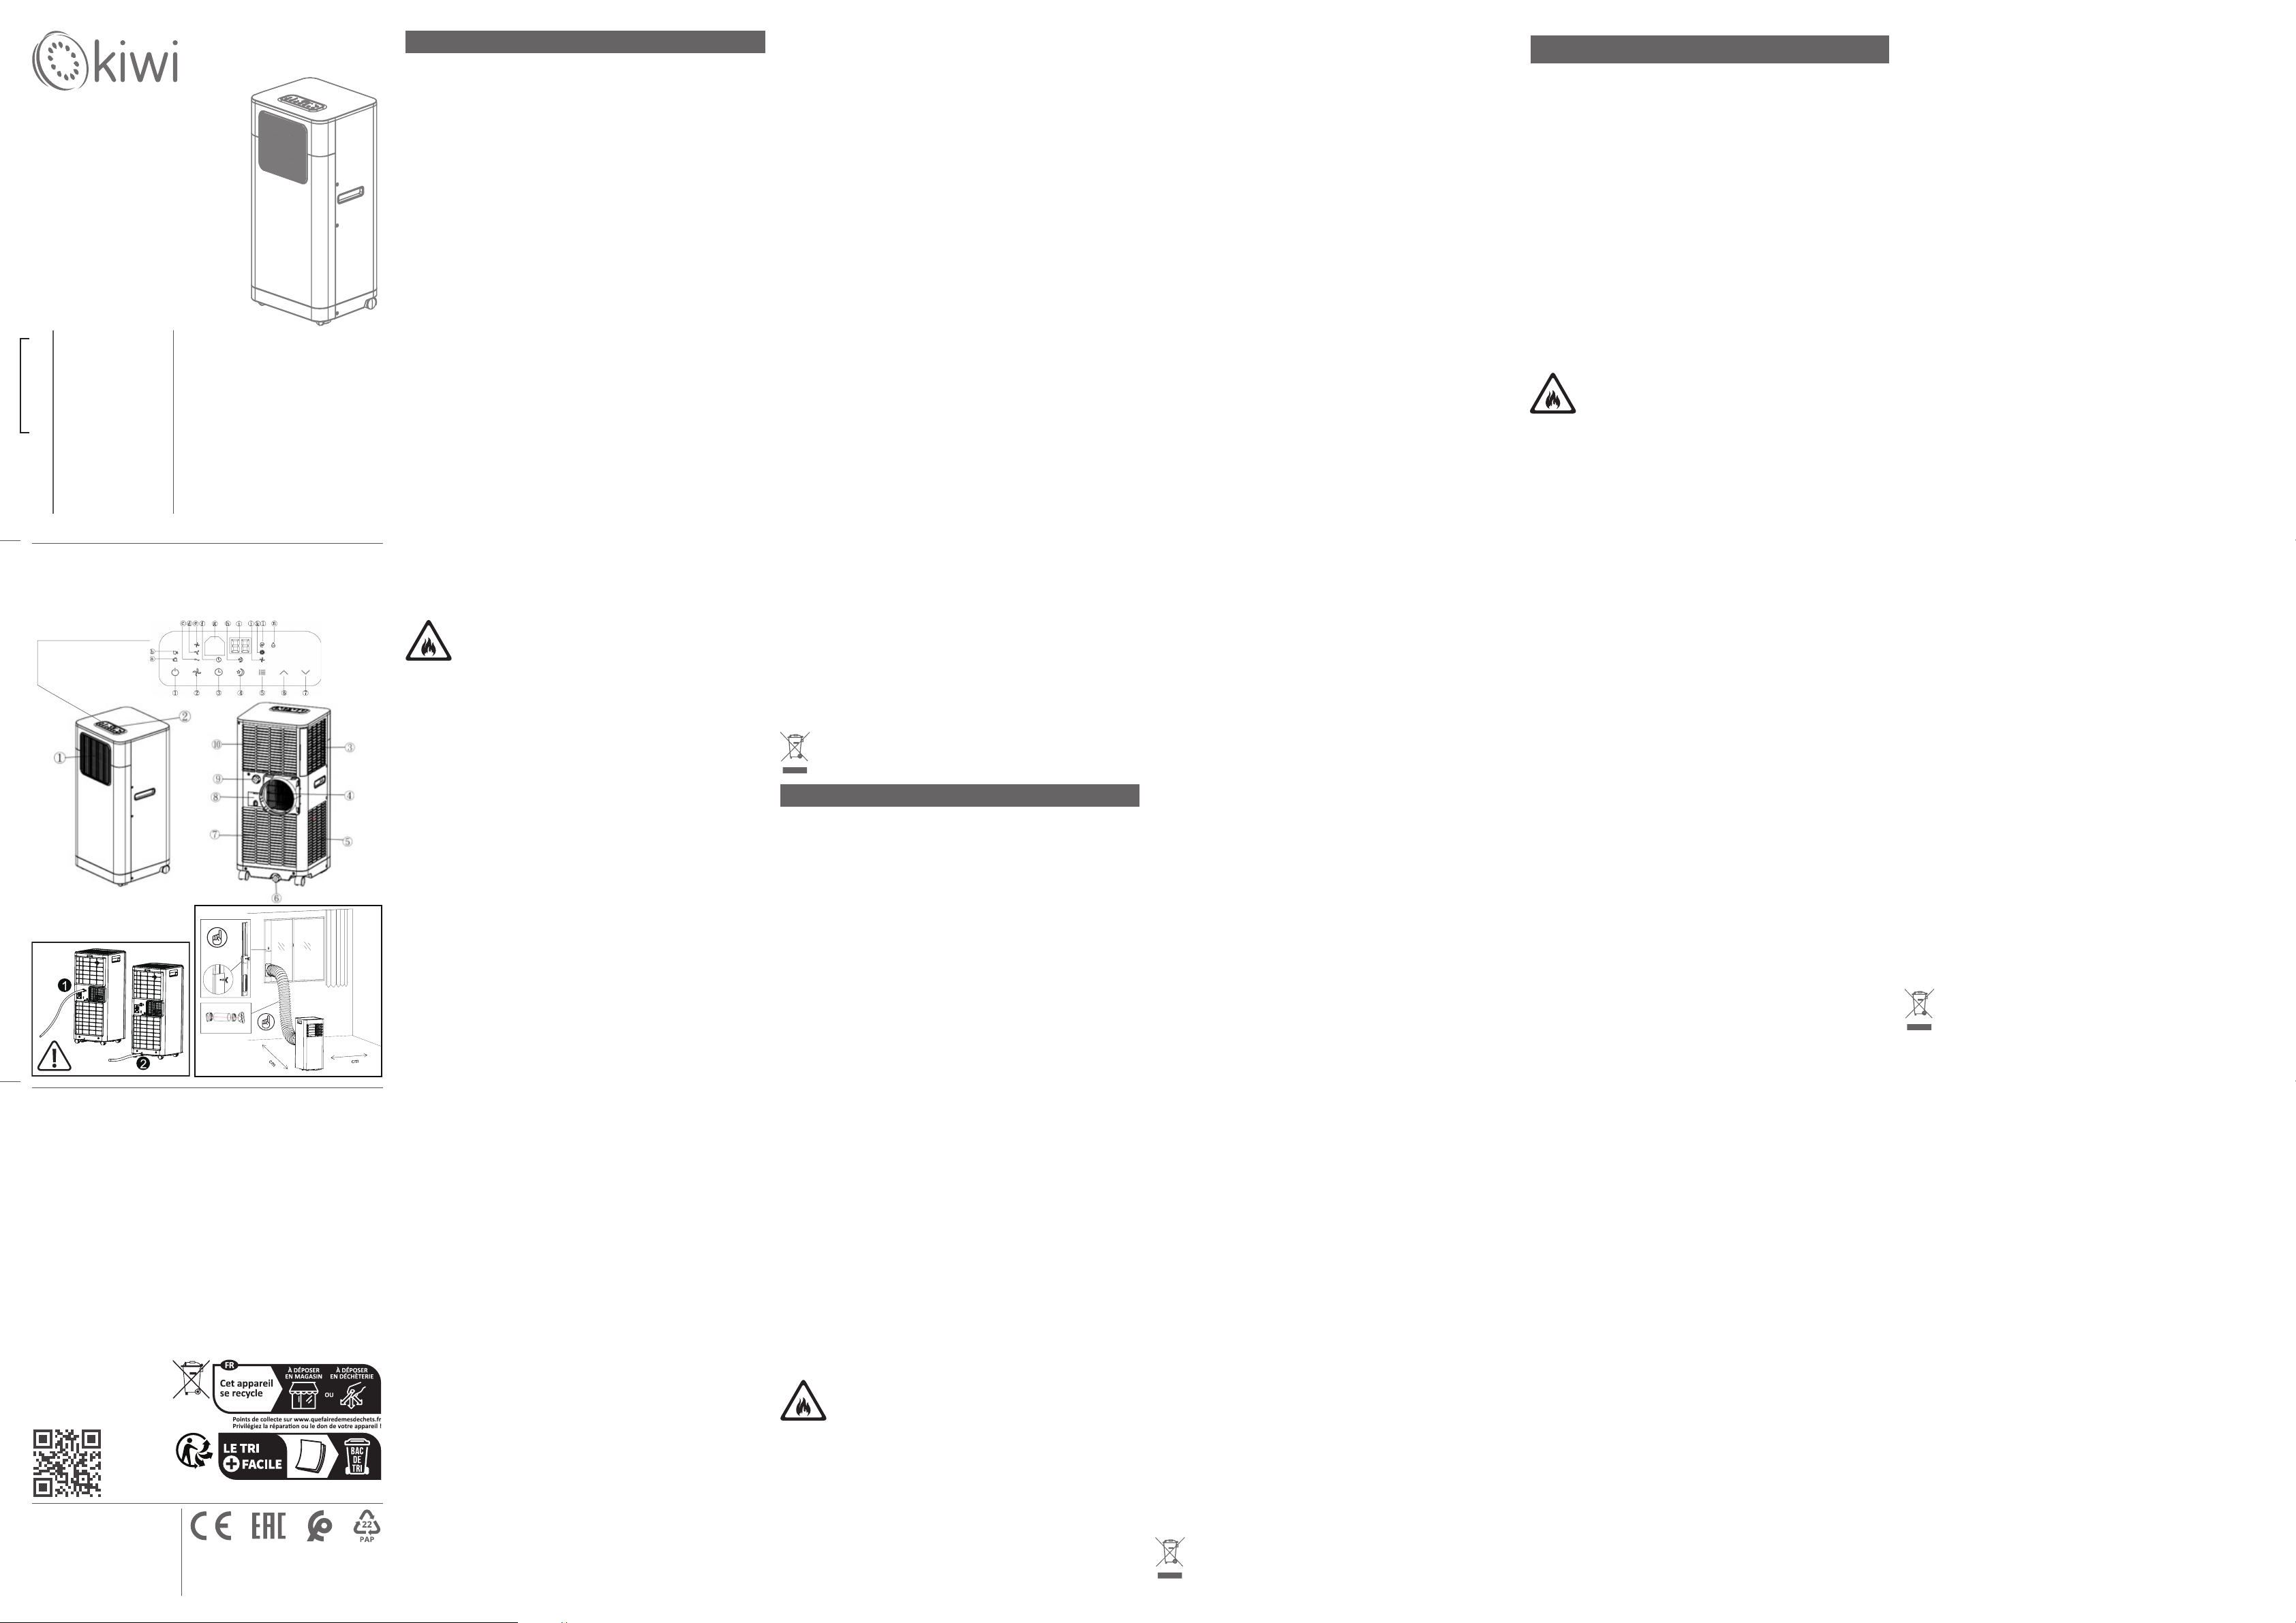
Important: 1-When the water drain hose is connected to the middle
part at the rear, it will drain directly without accumulating water in the
appliance tank.
2-When the water drain hose is connected to the bottom, it will drain
for safety when the water tank is full. (Figure on the side)
PARTS DESCRIPTION
1. Air outlet 2.Control panel 3. Air inlet 4.Exhaust air outlet 5. Air inlet
6.Water stopper/drainage point (1) 7.Air inlet 8.Cord storage 9.Water
stopper/drainage point (2) 10.Air inlet
OPERATING PANEL
1. ON/OFF (power) soft touch button 2. Speed (ventilation) soft touch
button 3. “Timer” soft touch button 4. “Sleep” soft touch button 5.
“Mode” selection soft touch button 6. ‘Temperature up’ soft touch
button 7. ‘Temperature down’ soft touch button
a. Compressor operation indicator b. “Water Full” indicator c. Low
ventilation indicator d. Middle ventilation indicator e. High ventilation
indicator f. “Timer” indicator g. Receiver for remote control h. “Sleep”
indicator i. Display window j. “Fan” mode indicator k. “Cooling” mode
indicator l. “Automatic” mode indicator n. DEHUMIDIFY(DRY) indicator
BEFORE THE FIRST USE
• Take the appliance and accessories out the box. Remove the stickers,
protective foil or plastic from the device.
• This device has montage accessories. The device must assamble as
near side gure. Montage accessories: Outer joint of exhaust duct. Inner
joint of exhaust duct. Window partition A. Windows partition B. Wing
nut. Gasket. Wing screw. Exhaust duct. Drain hose.
• Do not block the air inlets and outlets and ensure a free space of
minimum 50 cm around the appliance.
• Plug in the power cord. (Note: Before connecting the device, make
sure that the voltage indicated on the device is the same as the local
voltage.)
USE
• Press Power button and start use. The device has 3 modes: Cooling
mode, Dehumidication mode and Fan mode.
• Cooling mode: Select with the Mode button and the indicator light
shows Cooling. Temperature setting range: 17-30°C. Set the wind
speed to high or low.
• Dehumidication mode: Select with the Mode button and the
indicator light shows Dehumidication. The LCD screen shows “dH”. You
cannot adjust the wind speed. The device automatically adjusts the
working conditions according to the environmental conditions.
• Fan mode: Select with the Mode button and the indicator light shows
Fan. Set the wind speed to high or low. The LCD screen shows “25” as
standard.
• Sleep function: When the device is set to sleep mode, the wind speed
automatically turns to low wind.
• Timer setting: Press Timer button and set timer with + and - buttons.
Device can adjustable 1-24 hours. Each numbers show hour. Set and
wait 5 second for conrming.
• Water full reminder: The device has automatic inspection and fault
display functions. When the water tank of the device is full of water,
the “Full” icon ashes on the screen of the device and the E7 code is
displayed on the screen. Turn o the device and unplug it. After
emptying the water tank, the device will be ready to work again.
• Remote control can adjust device all control panel buttons.
CLEANING AND MAINTENANCE
• Before cleaning and maintenance, you should turn o the machine
and unplug it.
• Clean the device body by wiping it with a soft and slightly damp cloth.
Do not use abrasive detergents.
T • here are 2 lters behind the device. First, remove the inner connection
of the exhaust duct and the lter screen in order. You can clean the dust
on the surface of the lter with a vacuum cleaner at low setting. If the
lter is very dirty, wipe it with warm water and mild detergent and dry
it completely. You can attach it to the device after it is completely dry.
MAINTENANCE
To store the machine because it has not been used for a long time, pay
attention to the following steps:
1. Remove the drain plug of the bottom tray and drain the water in the
bottom tray. Clean the machine body and lter.
2.Select the “Fan” mode, and the air conditioner will run for a period of
time to dry its interior.
3. Turn o the power switch, wind up and tie the power cord.
4. Place the machine in a cool and dry environment.
SÉCURITÉ
CONSIGNES IMPORTANTES SUR LA SÉCURITÉ D’UTILISATION VEUILLEZ
LIRE ATTENTIVEMENT ET CONSERVER POUR RÉFÉRENCE ULTÉRIEURE !
• Le fabricant ne peut être tenu responsable des dommages causés en
ignorant les consignes de sécurité.
• Si le cordon d’alimentation est endommagé, il doit être remplacé par
le fabricant, son agent de service ou des personnes de qualication
similaire an d’éviter tout danger.
• Ne déplacez jamais l’appareil en tirant sur le cordon et assurez-vous
que le cordon ne peut pas s’emmêler.
• L’appareil doit être placé sur une surface stable et plane.
• L’utilisateur ne doit pas laisser l’appareil sans surveillance lorsqu’il est
branché sur le secteur.
• Cet appareil doit être utilisé uniquement à des ns domestiques et
uniquement pour l’usage pour lequel il a été conçu.
• Pour vous protéger contre un choc électrique, ne plongez pas le cordon,
la che ou l’appareil dans l’eau ou tout autre liquide.
• L’appareil ne doit être branché que sur une prise reliée à la terre.
Assurez-vous que la tension indiquée sur l’appareil correspond à la
tension du secteur local avant de le brancher.
SÉCURITÉ ENFANTS : Cet appareil ne doit pas être utilisé par des enfants
de moins de 8 ans. Cet appareil ne peut être utilisé que par des enfants
de 8 ans et plus et des personnes ayant des capacités physiques,
sensorielles ou mentales réduites ou manquant d’expérience et de
connaissances s’ils sont surveillés ou s’ils comprennent les dangers et
les instructions concernant l’utilisation de l’appareil de manière sûre.
Les enfants ne doivent pas jouer avec l’appareil. Gardez l’appareil et le
cordon hors de portée des enfants de moins de 8 ans. Le nettoyage et
l’entretien ne doivent pas être eectués par des enfants, sauf s’ils ont
plus de 8 ans et sont sous surveillance.
SÉCURITÉ DE L’APPAREIL :
Attention : Ne placez pas cet appareil à proximité d’un
radiateur. Ne l’utilisez pas à proximité de gaz ou de liquides
inammables.
N’utilisez pas la prise si elle est desserrée ou endommagée. Ne modiez
pas la longueur du cordon d’alimentation et ne partagez pas la prise
avec d’autres appareils. N’essayez jamais de démonter ou de réparer le
déshumidicateur vous-même. Ne placez pas d’objet lourd sur le cordon
d’alimentation et assurez-vous que le cordon n’est pas comprimé. Ne
placez pas de vases à eurs ou d’autres récipients d’eau sur l’appareil.
Ne grimpez pas et ne vous asseyez pas sur l’appareil.
SICHERHEIT
WICHTIGE HINWEISE ZUR SICHERHEIT DES GEBRAUCHS BITTE SORGFÄLTIG
LESEN UND ZUM SPÄTEREN NACHSCHLAGEN AUFBEWAHREN!
• Bei Nichtbeachtung der Sicherheitshinweise kann der Hersteller nicht für
Schäden haftbar gemacht werden.
• Wenn das Netzkabel beschädigt ist, muss es vom Hersteller, seinem
Kundendienst oder ähnlich qualizierten Personen ausgetauscht werden,
um Gefährdungen zu vermeiden.
• Bewegen Sie das Gerät niemals am Kabel und stellen Sie sicher, dass sich
das Kabel nicht verheddern kann.
• Das Gerät muss auf einer stabilen, ebenen Fläche stehen.
• Der Benutzer darf das Gerät nicht unbeaufsichtigt lassen, während es an die
Stromversorgung angeschlossen ist.
• Dieses Gerät ist nur für den Haushalt und nur für den vorgesehenen Zweck
zu verwenden.
• Um sich vor einem Stromschlag zu schützen, tauchen Sie das Kabel, den
Stecker oder das Gerät nicht in Wasser oder andere Flüssigkeiten.
• Das Gerät darf nur an eine geerdete Steckdose angeschlossen
werden. Stellen Sie vor dem Einstecken sicher, dass die auf
dem Gerät angegebene Spannung mit der örtlichen Netzspannung
übereinstimmt.
KINDERSICHERHEIT: Dieses Gerät darf nicht von Kindern unter 8 Jahren
verwendet werden. Dieses Gerät darf nur von Kindern ab 8 Jahren und
Personen mit eingeschränkten körperlichen, sensorischen oder geistigen
Fähigkeiten oder mangelnder Erfahrung und Kenntnissen verwendet
werden, wenn sie beaufsichtigt werden oder die Gefahren und Anweisungen
zur sicheren Verwendung des Geräts verstehen. Kinder sollten nicht mit
dem Gerät spielen. Bewahren Sie das Gerät und das Kabel außerhalb der
Reichweite von Kindern unter 8 Jahren auf. Reinigung und Wartung dürfen
nicht von Kindern durchgeführt werden, es sei denn, sie sind älter als 8 Jahre
und werden beaufsichtigt.
GERÄTESICHERHEIT:
Achtung: Stellen Sie dieses Gerät nicht in der Nähe einer Heizung auf.
Verwenden Sie es nicht in der Nähe von brennbaren Gasen oder Flüssigkeiten.
Verwenden Sie die Steckdose nicht, wenn sie locker oder beschädigt ist.
Ändern Sie nicht die Länge des Netzkabels und teilen Sie die Steckdose
nicht mit anderen Geräten. Versuchen Sie niemals, den Luftentfeuchter
selbst auseinanderzunehmen oder zu reparieren. Stellen Sie keine schweren
Gegenstände auf das Netzkabel und stellen Sie sicher, dass das Kabel nicht
zusammengedrückt wird. Stellen Sie keine Blumenvasen oder andere
Wasserbehälter auf das Gerät. Klettern Sie nicht auf das Gerät und setzen
Sie sich nicht darauf.
Wichtig: 1-Wenn der Wasserablaufschlauch an den mittleren Teil an der
Rückseite angeschlossen ist, läuft er direkt ab, ohne dass sich Wasser im
Gerätetank ansammelt.
2-Wenn der Wasserablaufschlauch an der Unterseite angeschlossen ist, läuft
er aus Sicherheitsgründen ab, wenn der Wassertank voll ist. (Abbildung auf
der Seite)
TEILEBESCHREIBUNG
1. Luftauslass 2. Bedienfeld 3. Lufteinlass 4. Abluftauslass 5. Lufteinlass
6. Wasserstopper/Ablasspunkt (1) 7. Lufteinlass 8. Kabelaufbewahrung 9.
Wasserstopper/Ablasspunkt (2) 10. Lufteinlass
BEDIENFELD
1. Soft-Touch-Taste „EIN/AUS“ (Strom) 2. Soft-Touch-Taste „Geschwindigkeit“
(Belüftung) 3. Soft-Touch-Taste „Timer“ 4. Soft-Touch-Taste „Schlaf“ 5. Soft-
Touch-Taste „Modus“-Auswahl 6. Soft-Touch-Taste „Temperatur erhöhen“ 7.
Soft-Touch-Taste „Temperatur verringern“
a. Anzeige Kompressorbetrieb b. Anzeige „Wasser voll“ c. Anzeige niedrige
Belüftung d. Anzeige mittlere Belüftung e. Anzeige hohe Belüftung f.
Anzeige „Timer“ g. Empfänger für Fernbedienung h. Anzeige „Schlaf“ i.
Anzeigefenster j. Anzeige „Lüfter“-Modus k. Anzeige „Kühlen“-Modus l.
Anzeige „Automatik“-Modus n. Anzeige ENTFEUCHTEN (TROCKNEN)
VOR DEM ERSTEN GEBRAUCH
• Nehmen Sie das Gerät und das Zubehör aus der Verpackung. Entfernen Sie
die Aufkleber, Schutzfolie oder Plastik vom Gerät.
• Dieses Gerät verfügt über Montagezubehör. Das Gerät muss wie in der
nebenstehenden Abbildung zusammengebaut werden. Montagezubehör:
Äußere Verbindung des Abluftkanals. Innere Verbindung des Abluftkanals.
Fenstertrennwand A. Fenstertrennwand B. Flügelmutter. Dichtung.
Flügelschraube. Abluftkanal. Ablaufschlauch.
• Blockieren Sie die Luftein- und -auslässe nicht und sorgen Sie für einen
Freiraum von mindestens
50
cm um das Gerät herum.
• Stecken Sie das Netzkabel ein. (Hinweis: Stellen Sie vor dem Anschließen
des Geräts sicher, dass die auf dem Gerät angegebene Spannung mit der
örtlichen Spannung übereinstimmt.)
KAC-7911
This product contains recyclable materials that comply with WEEE guidelines. Do not
dispose of this product as unsorted waste. Please contact your local municipality for a
recycling collection point.
Ce produit contient des matériaux recyclables conformes aux directives DEEE. Ne jetez
pas ce produit comme déchet non trié. Veuillez contacter votre municipalité locale
pour un point de collecte de recyclage.
Dieses Produkt enthält recycelbare Materialien, die den WEEE-Richtlinien entsprechen.
Entsorgen Sie dieses Produkt nicht als unsortierten Abfall. Bitte wenden Sie sich an
Ihre örtliche Gemeinde, um eine Recycling-Sammelstelle zu erhalten.
Üretim Tarihi/Production Date: 01-2025/K3888
/
Technical Data / Données Techniques / Technische Daten / Dati
Tecnici / Datos Técnicos / Dados Técnicos / Tehnički podaci /
Технические данные / Teknik Bilgi
/فصولا ءازجأ
Parts Description / Description Des Pièces / Teilebeschreibung
/ Descrizione Delle Parti / Descripción De Las Piezas / Descrição
Dos Componentes / Opis dijelova / Детали Описание / Parça
Tanımları
İthalatçı - İmalatçı Firma
/ Manufacturer-Importer
BMVA Elektronik San. ve Tic. A.Ş.
Osmangazi Mh, 2644. Sk. No:3/2
Kıraç-Esenyurt / Istanbul – Türkiye
Made In China, Fabriqué En Chine, Hergestellt in China,
Prodotto In Cina, Fabricado En China, Menşei: Çin,
Proizvedeno U Kini, Сделано в Китае,
Instruction Manual
Mode D'emploi
Bedienungsanleitung
Manuale Utente
Manual De Usuario
Manual De Utilizador
Upute Za Uporabu
Инструкция
Kullanım Kılavuzu
EN
FR
DE
IT
ES
PT
HR
RU
TR
AR
Mobile Air Conditioner
Climatiseur Portable
Tragbare Klimaanlage
Condizionatore Portatile
Aire Acondicionado Portátil
Ar Condicionado Portátil
Prijenosni Klima Uređaj
Портативный Кондиционер
Portatif Klima
Important : 1-Lorsque le tuyau d’évacuation d’eau est connecté à la partie
centrale à l’arrière, il s’écoulera directement sans accumuler d’eau dans le
réservoir de l’appareil.
2-Lorsque le tuyau d’évacuation d’eau est connecté au bas, il s’écoulera pour
plus de sécurité lorsque le réservoir d’eau est plein. (Figure sur le côté)
DESCRIPTION DES PIÈCES
11. Sortie d’air 2. Panneau de commande 3. Entrée d’air 4. Sortie d’air
d’échappement 5. Entrée d’air
6. Bouchon d’eau/point de drainage (1) 7. Entrée d’air 8. Rangement du
cordon 9. Bouchon d’eau/point de drainage (2) 10. Entrée d’air
PANNEAU DE COMMANDE
1. Bouton tactile marche/arrêt (alimentation) 2. Bouton tactile vitesse
(ventilation) 3. Bouton tactile « minuterie » 4. Bouton tactile « veille » 5.
Bouton tactile sélection « mode » 6. Bouton tactile « augmentation de la
température » 7. Bouton tactile « diminution de la température »
a. Indicateur de fonctionnement du compresseur b. Indicateur « plein d’eau
» c. Indicateur de faible ventilation d. Indicateur de ventilation moyenne e.
Indicateur de forte ventilation f. Indicateur « minuterie » g. Récepteur pour
télécommande h. Indicateur « veille » i. Fenêtre d’achage j. Indicateur de
mode « ventilateur » k. Indicateur de mode « refroidissement » l. Indicateur
de mode « Automatique » n. Indicateur de DÉSHUMIDIFICATION (SÉCHAGE)
AVANT LA PREMIÈRE UTILISATION
• Sortez l’appareil et les accessoires de la boîte. Retirez les autocollants, le
lm protecteur ou le plastique de l’appareil.
• Cet appareil est doté d’accessoires de montage. L’appareil doit être assemblé
comme sur la gure ci-contre. Accessoires de montage : Joint extérieur du
conduit d’évacuation. Joint intérieur du conduit d’évacuation. Cloison de
fenêtre A. Cloison de fenêtre B. Écrou à oreilles. Joint. Vis à oreilles. Conduit
d’évacuation. Tuyau de vidange.
• Ne pas obstruer les entrées et sorties d’air et laisser un espace libre d’au
moins 50 cm autour de l’appareil.
• Brancher le cordon d’alimentation. (Remarque : avant de brancher
l’appareil, s’assurer que la tension indiquée sur l’appareil est la même que
la tension locale.)
UTILISATION
• Appuyer sur le bouton Power et démarrer l’utilisation. L’appareil dispose
de 3 modes : mode Refroidissement, mode Déshumidication et mode
Ventilateur.
• Mode Refroidissement : Sélectionner avec le bouton Mode et le voyant
lumineux indique Refroidissement. Plage de réglage de la température :
17-30°C. Régler la vitesse du vent sur élevée ou basse.
• Mode Déshumidication : Sélectionner avec le bouton Mode et le voyant
lumineux indique Déshumidication. L’écran LCD ache « dH ». Vous ne
pouvez pas régler la vitesse du vent. L’appareil ajuste automatiquement
les conditions de fonctionnement en fonction des conditions
environnementales.
• Mode Ventilateur : Sélectionner avec le bouton Mode et le voyant lumineux
indique Ventilateur. Régler la vitesse du vent sur élevée ou basse. L’écran LCD
ache « 25 » par défaut.
• Fonction veille : Lorsque l’appareil est en mode veille, la vitesse du vent
passe automatiquement à un vent faible.
• Réglage de la minuterie : appuyez sur le bouton Minuterie et réglez
la minuterie avec les boutons + et -. L’appareil peut être réglé de 1 à 24
heures. Chaque chire indique l’heure. Réglez et attendez 5 secondes pour
conrmer.
• Rappel de plein d’eau : l’appareil dispose de fonctions d’inspection
automatique et d’achage des défauts. Lorsque le réservoir d’eau de
l’appareil est plein d’eau, l’icône « Plein » clignote sur l’écran de l’appareil
et le code E7 s’ache sur l’écran. Éteignez l’appareil et débranchez-le. Après
avoir vidé le réservoir d’eau, l’appareil sera à nouveau prêt à fonctionner.
• La télécommande peut régler tous les boutons du panneau de commande
de l’appareil.
NETTOYAGE ET ENTRETIEN
• Avant le nettoyage et l’entretien, vous devez éteindre la machine et la
débrancher.
• Nettoyez le corps de l’appareil en l’essuyant avec un chion doux et
légèrement humide. N’utilisez pas de détergents abrasifs.
T • Il y a 2 ltres derrière l’appareil. Tout d’abord, retirez la connexion interne
du conduit d’évacuation et l’écran du ltre dans l’ordre. Vous pouvez nettoyer
la poussière sur la surface du ltre avec un aspirateur à faible puissance. Si
le ltre est très sale, essuyez-le avec de l’eau tiède et un détergent doux et
séchez-le complètement. Vous pouvez le xer à l’appareil une fois qu’il est
complètement sec.
ENTRETIEN
Pour ranger la machine parce qu’elle n’a pas été utilisée pendant une longue
période, faites attention aux étapes suivantes:
1. Retirez le bouchon de vidange du bac inférieur et vidangez l’eau du bac
inférieur. Nettoyez le corps de la machine et le ltre.
2. Sélectionnez le mode « Ventilateur » et le climatiseur fonctionnera
pendant un certain temps pour sécher son intérieur.
3. Éteignez l’interrupteur d’alimentation, enroulez et attachez le cordon
d’alimentation.
4. Placez la machine dans un environnement frais et sec.
VERWENDUNG
• Drücken Sie die Einschalttaste und beginnen Sie mit der Verwendung. Das Gerät
verfügt über 3 Modi: Kühlmodus, Entfeuchtungsmodus und Lüftermodus.
• Kühlmodus: Wählen Sie mit der Modustaste aus und die Kontrollleuchte
zeigt Kühlen an. Temperatureinstellungsbereich: 17–30 °C. Stellen Sie die
Windgeschwindigkeit auf hoch oder niedrig ein.
• Entfeuchtungsmodus: Wählen Sie mit der Modustaste aus und die Kontrollleuchte
zeigt Entfeuchtung an. Der LCD-Bildschirm zeigt „dH“. Sie können die
Windgeschwindigkeit nicht einstellen. Das Gerät passt die Arbeitsbedingungen
automatisch an die Umgebungsbedingungen an.
• Lüftermodus: Wählen Sie mit der Modustaste aus und die Kontrollleuchte zeigt
Lüfter an. Stellen Sie die Windgeschwindigkeit auf hoch oder niedrig ein. Der
LCD-Bildschirm zeigt standardmäßig „25“ an.
• Schlaunktion: Wenn das Gerät in den Schlafmodus versetzt wird, wird
die Windgeschwindigkeit automatisch auf schwache Windgeschwindigkeit
umgestellt.
• Timereinstellung: Drücken Sie die Timer-Taste und stellen Sie den Timer mit
den Tasten + und - ein. Das Gerät kann von 1 bis 24 Stunden eingestellt werden.
Jede Zahl zeigt die Stunde an. Stellen Sie ein und warten Sie 5 Sekunden zur
Bestätigung.
• Wasser-Voll-Erinnerung: Das Gerät verfügt über automatische Inspektions- und
Fehleranzeigefunktionen. Wenn der Wassertank des Geräts voll ist, blinkt das
„Voll“-Symbol auf dem Bildschirm des Geräts und der E7-Code wird auf dem
Bildschirm angezeigt. Schalten Sie das Gerät aus und ziehen Sie den Stecker. Nach
dem Entleeren des Wassertanks ist das Gerät wieder betriebsbereit.
• Über die Fernbedienung können alle Tasten des Bedienfelds des Geräts
eingestellt werden.
REINIGUNG UND WARTUNG
• Vor der Reinigung und Wartung sollten Sie das Gerät ausschalten und den
Stecker ziehen.
• Reinigen Sie das Gerätegehäuse, indem Sie es mit einem weichen und leicht
feuchten Tuch abwischen. Verwenden Sie keine Scheuermittel.
• Hinter dem Gerät benden sich 2 Filter. Entfernen Sie zuerst der Reihe nach die
innere Verbindung des Abluftkanals und das Filtersieb. Sie können den Staub auf
der Filteroberäche mit einem Staubsauger bei niedriger Einstellung entfernen.
Wenn der Filter sehr schmutzig ist, wischen Sie ihn mit warmem Wasser und
einem milden Reinigungsmittel ab und trocknen Sie ihn vollständig. Sie können
ihn am Gerät anbringen, nachdem er vollständig getrocknet ist.
WARTUNG
Wenn Sie die Maschine einlagern möchten, weil sie lange Zeit nicht verwendet
wurde, beachten Sie die folgenden Schritte:
1. Entfernen Sie den Ablassstopfen der Bodenschale und lassen Sie das Wasser in
der Bodenschale ab. Reinigen Sie das Maschinengehäuse und den Filter.
2. Wählen Sie den „Lüfter“-Modus und die Klimaanlage läuft eine Zeit lang, um
das Innere zu trocknen.
3. Schalten Sie den Netzschalter aus, wickeln Sie das Netzkabel auf und binden
Sie es fest.
4. Stellen Sie die Maschine an einen kühlen und trockenen Ort.
Cihaz Ebadı / Unit Dimensions : 328x280x700 mm
Ambalaj Ebadı / Carton Dimensions : 370x323x884 mm
Net Ağırlık / Net Weight : 22.5 kg
Brüt Ağırlık / Gross Weight : 24.5 kg
Elektrik Girişi / Electrical Input : AC220-240V, 50Hz
Anma gücü / Rated Power : 950W
Enerji verimliliği oranı / Energy eciency ratio : 2.60
Soğutma gazı / Refrigerant Gas : R290/180g
Soğutma kapasitesi / Cooling Capacity : 9000 BTU
Gürültü seviyesi / Noise Level : 65dB(A)
Uygun kullanımalanı / Suitable area : 10-14m2
kiwi-home.com
50
50



Bu ürün hakkındaki sohbete katıl
Burada Kiwi KAC-7911 Klima hakkında ne düşündüğünüzü paylaşabilirsiniz. Bir sorunuz varsa öncelikle kılavuzu dikkatlice okuyun. Kılavuz talebinde bulunmak için iletişim formumuzu kullanabilirsiniz.